¶ Intro
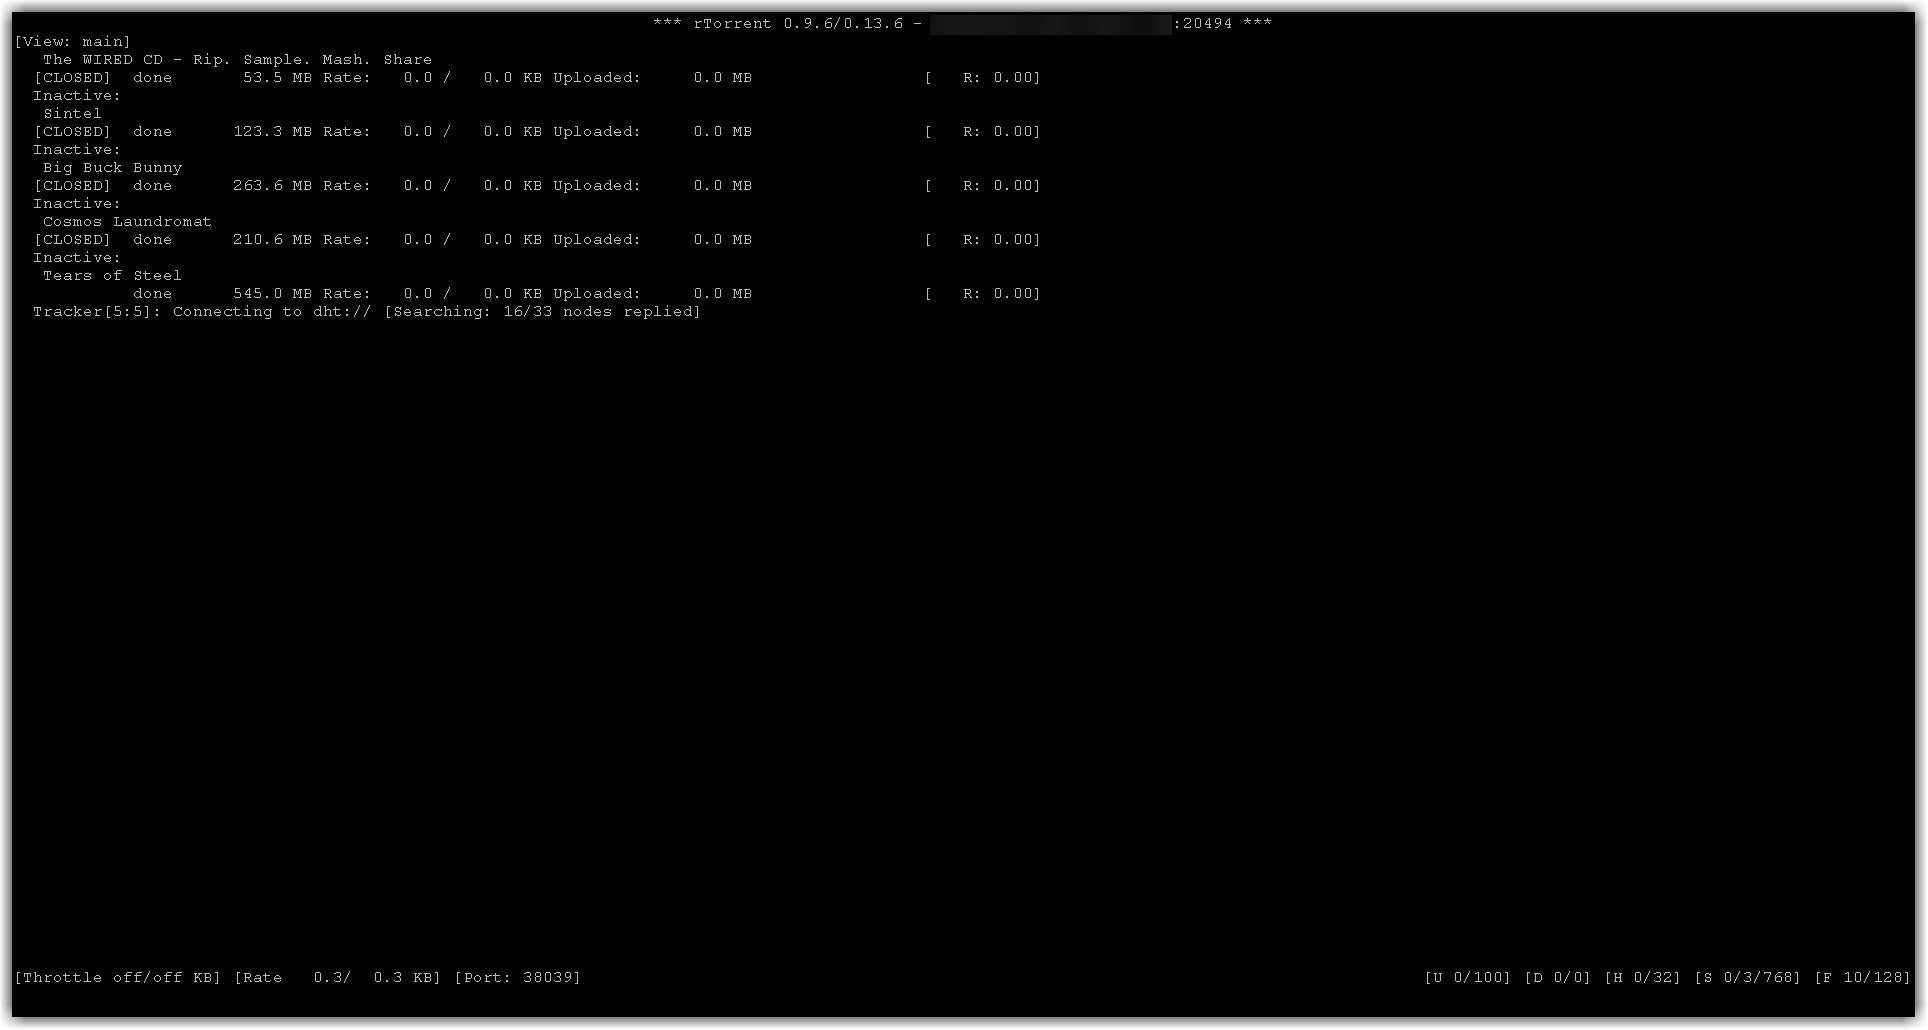
rTorrent is a quick and efficient bittorrent client that uses the libTorrent library (not to be confused with libtorrent-rasterbar) . It is written in C++ and provides a terminal-based user interface via the ncurses programming library. When combined with a terminal multiplexer (e.g. GNU Screen or Tmux) and Secure Shell, it becomes a convenient remote bittorrent client.
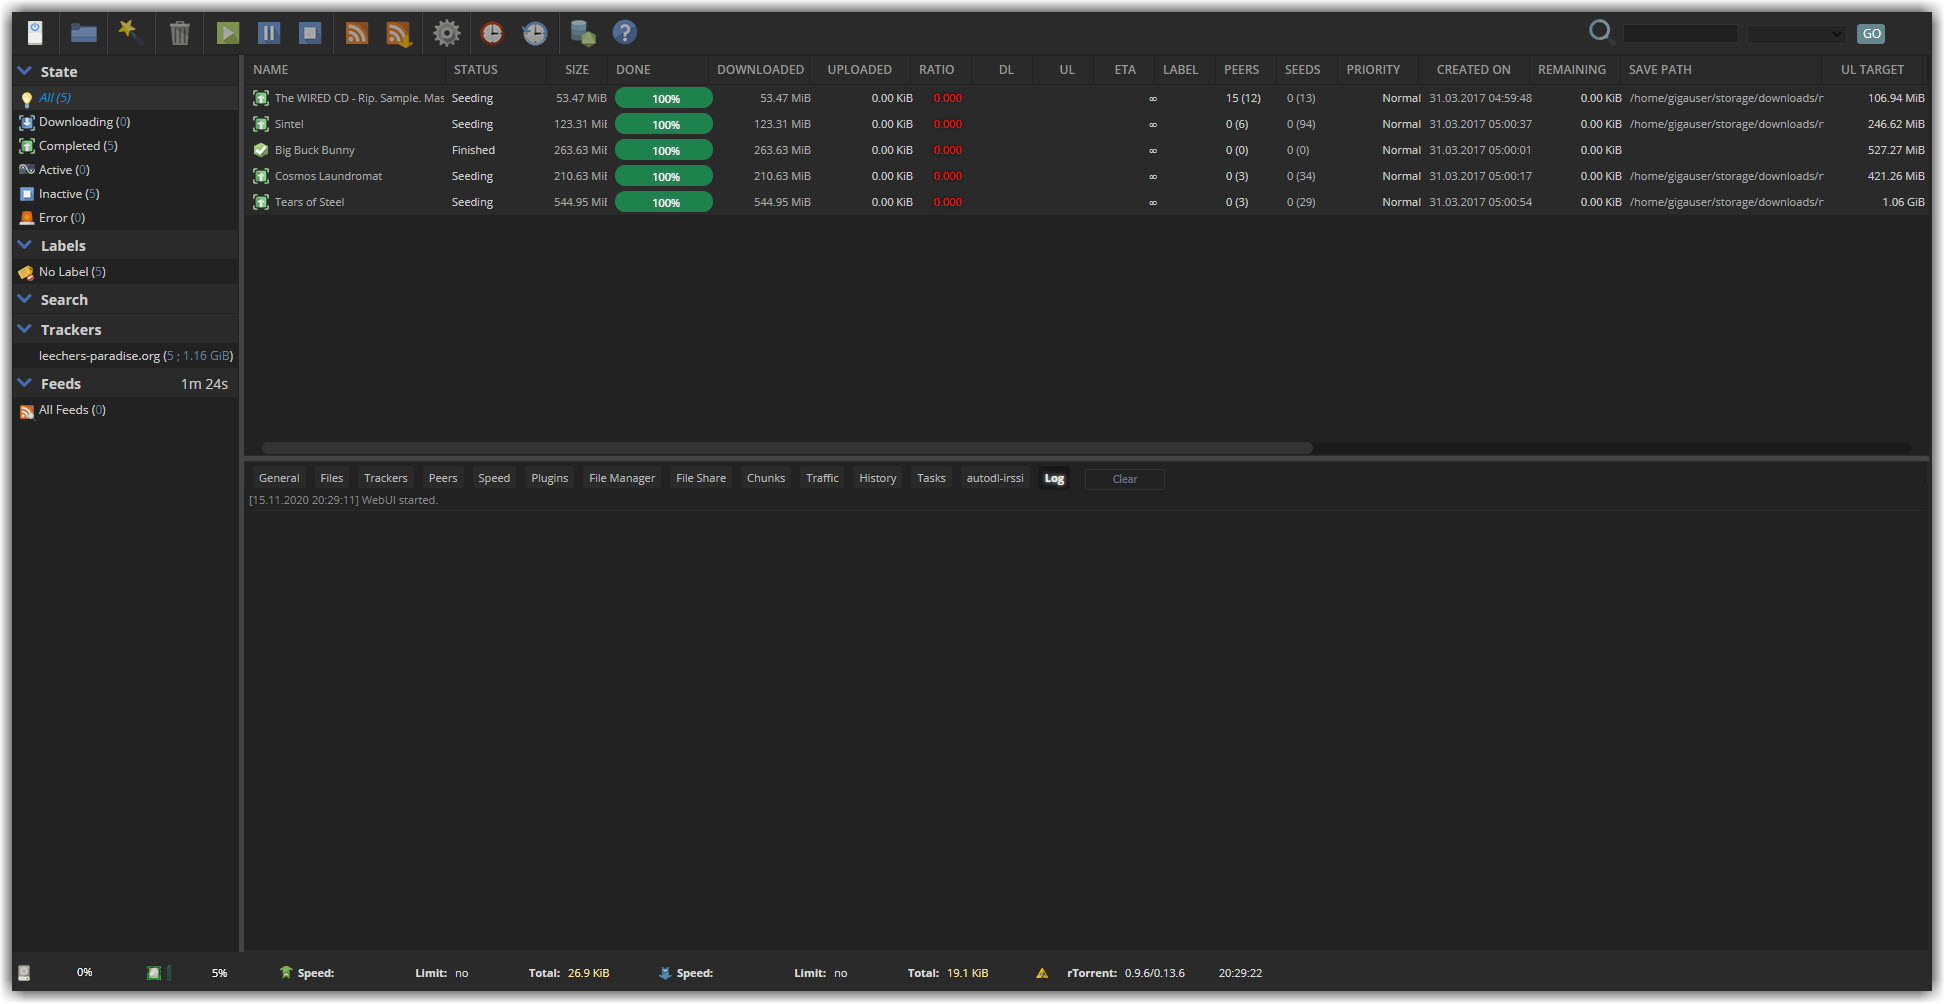
ruTorrent is a PHP frontend/web interface to rTorrent. It uses rTorrent’s built-in XML-RPC server to communicate with it. It was designed to emulate the look and feel of µTorrent webui so its appearance is quite similar to the µTorrent webui. The name ruTorrent is the combination of µTorrent and rtorrent.
![]()
¶ Availability
Please check our application chart to see which GigaDrive Plans are eligible to install this application.
¶ Features
- rTorrent
- No-frills ncurses interface
- Runs as a daemon, using a terminal multiplexer like tmux or screen (and 0.9.7+ has a ‘real’ daemon mode)
- Resource-friendly, ideal to run on a Raspberry Pi or a small VPS
- Scriptable and extensible via built-in commands and XMLRPC clients
- Very large choice of web frontends
- Support for DHT and PEX
- Magnet links
- Supported on nearly all trackers
- Implemented in C++, runs on all major POSIX platforms
- ruTorrent
- Lightweight server side, so it can be installed on old and low-end servers and even on some SOHO routers
- Highly extensible and has many custom plugins
- Modern look
¶ Overview
- rTorrent
- ruTorrent
¶ Installing ruTorrent
All our plans come pre-configured with rTorrent + ruTorrent and are ready for use. However, if you want you can install rTorrent/ruTorrent via SSH.
¶ Using ruTorrent
¶ Logging in
- Navigate to the GigaDrive Manager page and click ruTorrent button under the Basic Apps section to access ruTorrent WebUI.
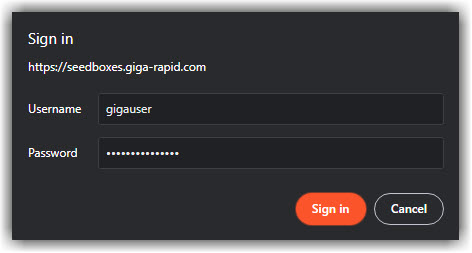
- The username and password to access ruTorrent can be found in your Login Email. Enter them when prompted.
¶ UI Overview
¶ Main UI
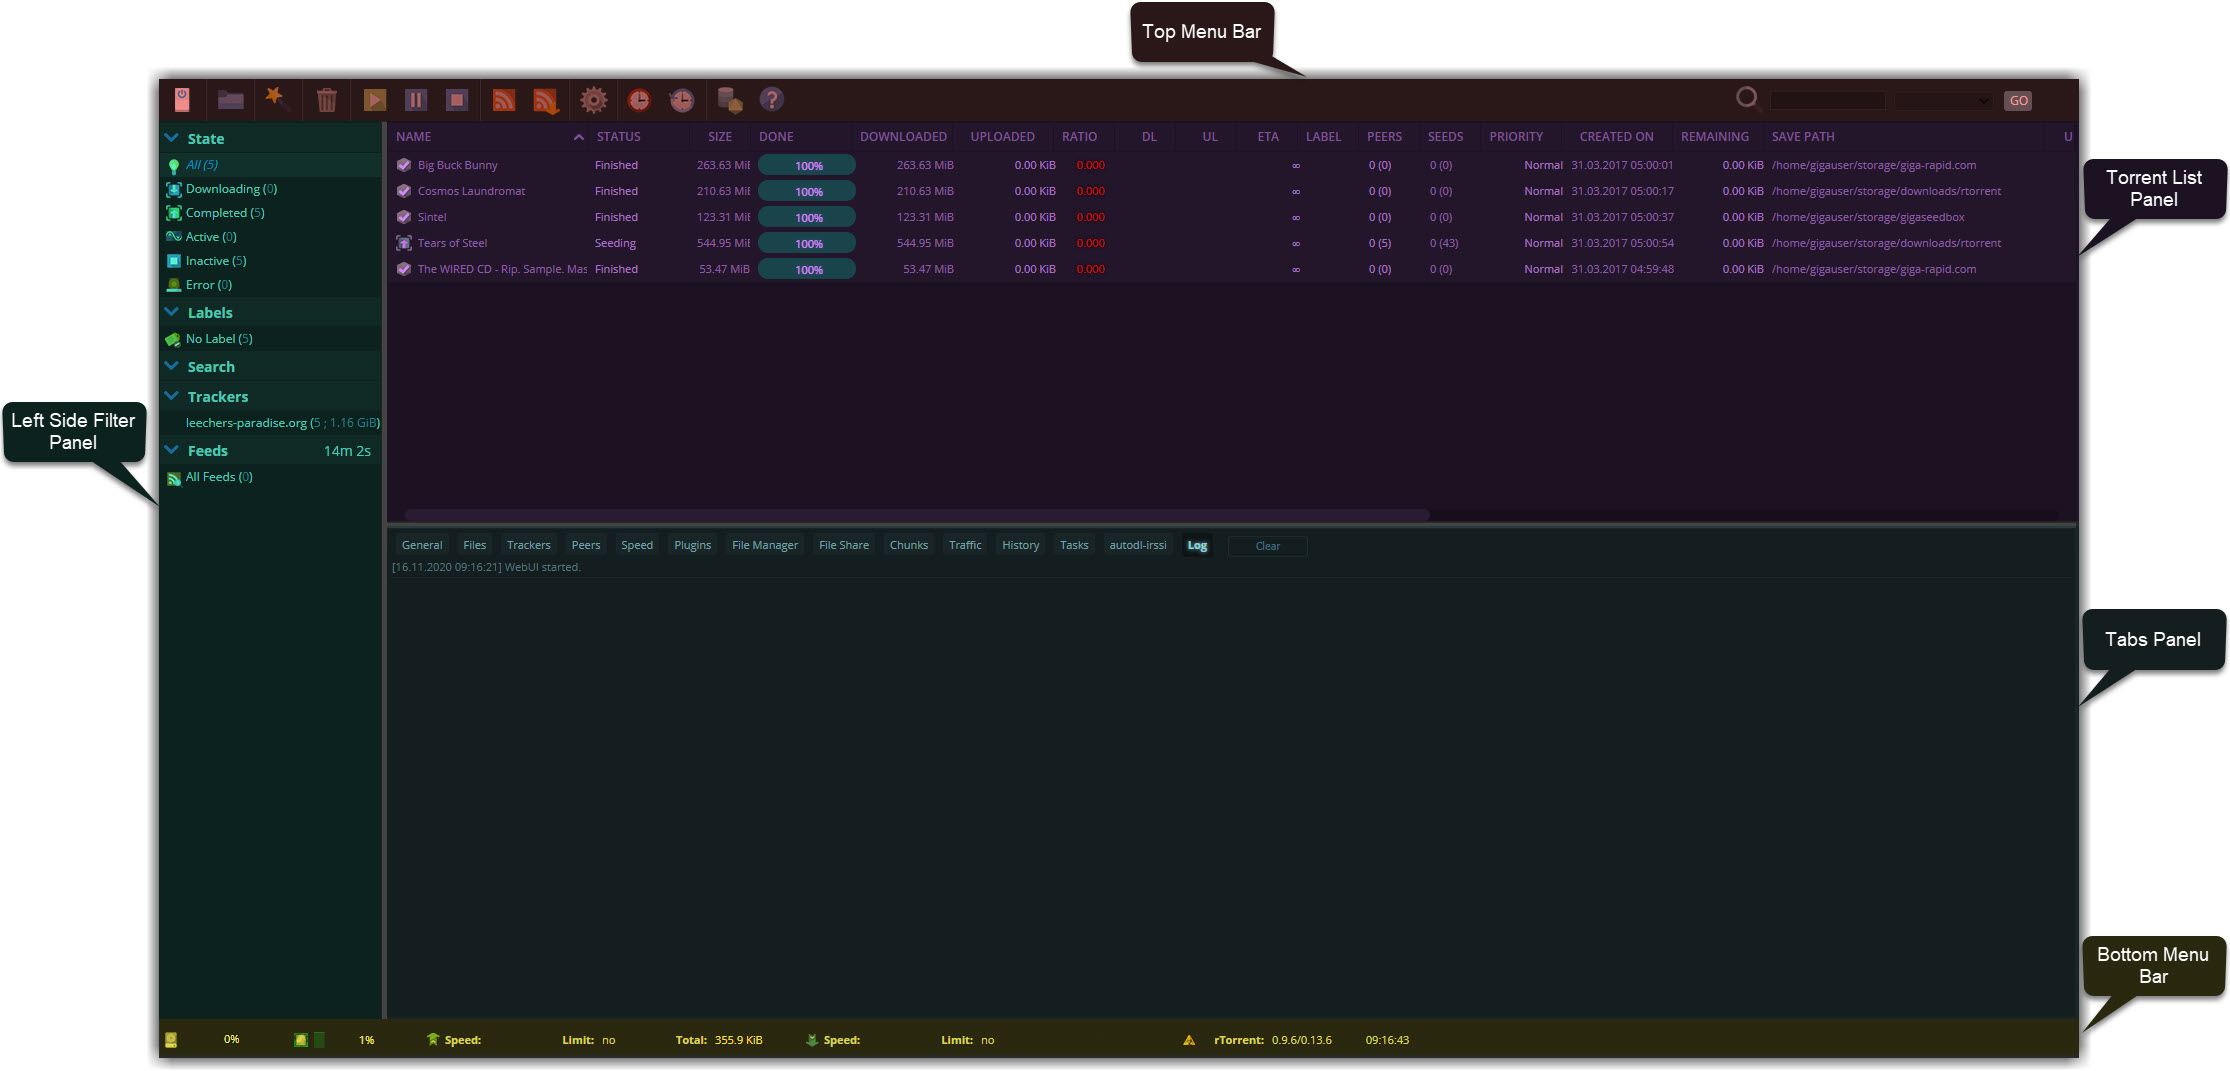
¶ Top Menu Bar

¶ Bottom Menu Bar

¶ Tabs Panel
In this tab we can find detailed information about any selected torrent.

For the selected torrent -
- Time elapsed is showing how much time is elapsed since starting
- Downloaded is showing how much data has already been downloaded
- Download Speed is showing the real-time download speed
- Uploaded is showing how much data has already been uploaded
- Seeds is showing how many seeders are connected currently
- Peers is showing how many peers are connected
- Tracker is showing info regarding the tracker URL and it’s status
- Save As is showing the download path of your torrent data
- Free Disk Space shows the remaining free space on your GigaDrive’s hard drive
- Created On shows the torrent creation datetime
This tab shows all files or parts for the current selected torrent and download status of each. You can use this tab to set per-file download priority. You can also download files via HTTP(s) just by double-clicking on a file if you have the data plugin installed.

This tab will show information regarding currently loaded tracker(s) of a selected torrent, their name, protocol they use, status, group, how many seeds/peers those tracker(s) are using, download status, when is the time of the last update, the interval and whether the tracker(s) are private or not.

This tab will list real-time information about all the connected peers, their country, speed, and much more for a selected torrent. This feature requires a plugin called show_peers_like_wtorrent. To display the country flag for each peer GeoIP plugin needs to installed and enabled.

This tab shows a real-time graph of upload and download speed over the last few minutes.

This tab lists currently loaded plugins for ruTorrent. To disable/enable a particular plugin, just right click on the plugin name and select Launch > Disable or Enable.

The file manager plugin for ruTorrent provides all basic file management features.

Features:
- Support for file operations: copy/move/delete/rename
- Hotkeys for copy/move actions (ctrl/cmd-c/x/v)
- Integrated operations in torrent Files tab
- Using twigjs for views
- Sfv checksum functionality
- Text/nfo viewer
- File archive support for extract/create operations
- Video screenshots functionality (Requires screenshots plugin)
- You can create file download links, password protected with an expire timer and share them (Requires fileshare plugin)
This tab shows which pieces of a torrent have been downloaded (requires chunks plugin).

This tab shows per tracker, and overal traffic statistics in a variety of time intervals (requires traffic plugin).

This tab keeps track of all torrents downloaded/uploaded for our session. This feature is provided by a plugin named history.

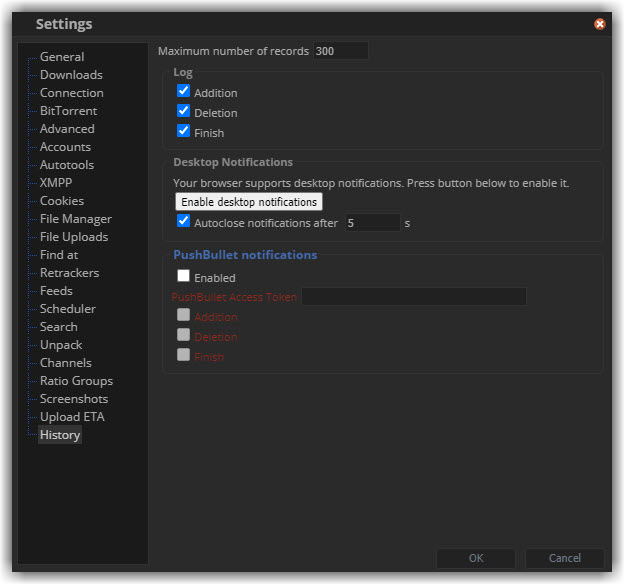
This tab will only be shown if the autodl-irssi plugin for ruTorrent is installed and configured. This tab is showing log information about autodl-irssi and provides basic operations for this plugin.

This tab shows error messages, and other system events.

¶ Adding a torrent
Torrents can be added to rTorrent either by using a magnet link or by uploading a .torrent file.
- To add a torrent click the Add Torrent button which is located at the top menu bar.
- You will get a popup window like the following.
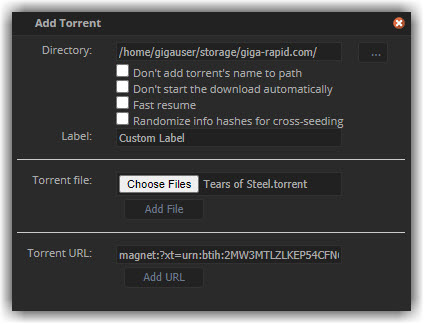
- Fill in the required fields and submit
- Directory: Click the icon and select the download path or keep it blank to download contents to the default download directory.
- Torrent File: If you have a .torrent file, click Choose Files. Then click Add File.
- Torrent URL: If you don’t have a torrent file but have a magnet link or a direct download link to the .torrent file, then paste that in this field and click Add URL.
- If successful, you will get a popup notification at the bottom-right corner like the following.

¶ Creating a torrent
- To add a torrent click the Create Torrent button which is located at the top menu bar.
- You will get a popup window like the following.
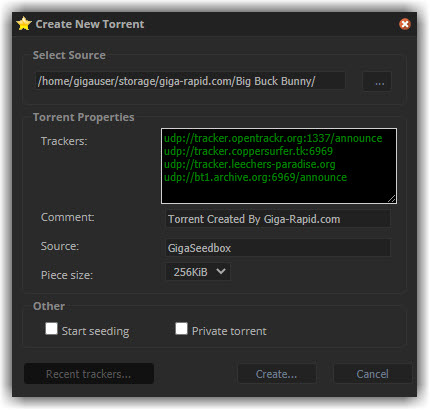
- Fill in the required fields.
- Select Source: Click the icon and select the source file or directory for your torrent.
- Torrent Properties:
- Trackers: Here you can add tracker annouce url(s). For more than one tracker, each tracker must be on a separate row i.e they must be separated by a newline. If you are creating a private torrent, then you should add only one tracker url.
- Comment: You can add an additional comment for your torrent here. This field is optional.
- Source: You can mention the source of your torrent here. This field is optional.
- Piece size: Set this to
- 1MB if the total size of your torrent data is less than 500MB
- 2MB if the total size of your torrent data is between 500MB and 1GB
- 4MB if the total size of your torrent data is between 1GB to 2GB
- 8MB if the total size of your torrent data is between 2GB to 4GB
- 16MB if the total size of your torrent data is greater than 4GB
- Other:
- Start seeding: Check this to automatically start seeding right after the torrent is created.
- Private torrent: Check this if you are uploading to a private torrent tracker.
- Click Create. This will open the console window. Here you can see the progress, any status information and errors that occur.
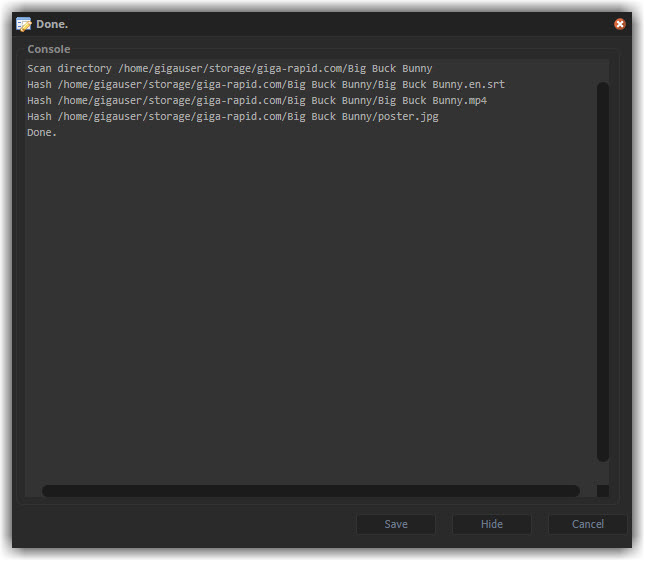
When everything is finished and you see Done. in the status window, you will have the option to download the .torrent file directly from ruTorrent by clicking the Save button.
¶ Limiting seeding ratio
-
Click the Settings button which is located at the top menu bar and switch to the Ratio Groups tab.
-
You will get a popup window like the following.
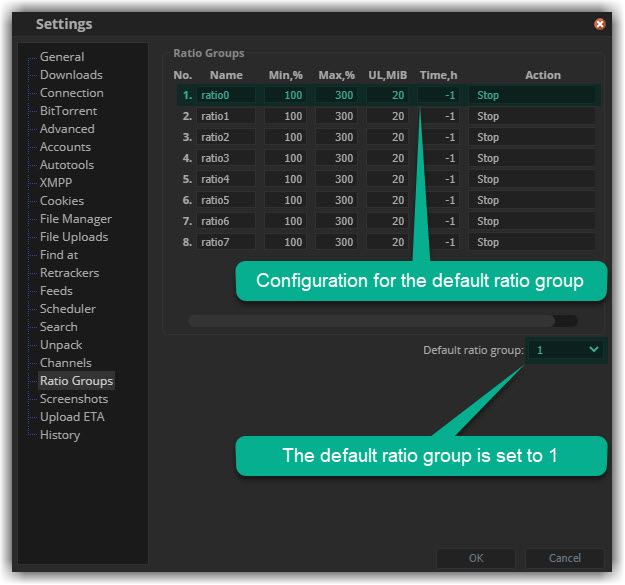
-
Fill out any of the ratio groups and select the corresponding group number in the dropdown menu Default ratio group(Only if you want to automatically apply the ratio rule to all new torrents). You can choose any other action than Stop for a ratio group such as Set channel to X to throttle the download/upload speed once the torrent(s) has (have) reached the configured requirement. Here X refers to a channel name in the Channels tab.
-
Each ratio group consists of 4 different conditions ( Min,% / Max,% / UL,MiB / Time,h ) and an action. Whether the action of a ratio group will be triggered depends on which conditions have been satisfied. Whether an individual condition has been satisfied (for a particular torrent) depends on either how much has been uploaded in percentage (Min,% and Max,%) or how much has been uploaded in MB (UL,MiB) or how many hours the torrent has been seeded (Time,h)
-
For simplicity, these four conditions can be put together in two different groups:
- The Min,% and UL,MB conditions (mandatory): These conditions are packaged together. That means only if both conditions have been satisfied, the action will be triggered. One condition alone doesn’t suffice.
- The Max,% and Time,h conditions (optional): Each of these condition is independend from all other conditions. That means, as soon as one of Max,% or Time,h is satisfied, the action will be triggered, regardless of whether the other conditions are satisfied or not. So these are hard limits. You can turn the Max,% condition off with 0 and the Time,h conditions with -1.
-
Examples are given as follows -
- Stop torrent(s) a after reaching a 1.0 ratio. If Min % = Max % then the UL,MiB condition has (practically) no effect. The Time,h condition has to be turned off (-1).
Name Min, % Max, % UL, MiB Time, h Action seed-1.0 100 100 0 -1 Stop - Stop torrent(s) a after reaching a 2.0 ratio.
Name Min, % Max, % UL, MiB Time, h Action seed-2.0 200 200 0 -1 Stop - Stop torrent(s) a after reaching a 10.0 ratio.
Name Min, % Max, % UL, MiB Time, h Action seed-10.0 1000 1000 0 -1 Stop - Stop torrent(s) always after 48 hours of seeding regardless of how much (or little) has been uploaded. In this case, we set the Min,% condition to a very high value that is very unlikely to be reached by any torrent. This will (practically) turn both the Min % and the UL,MB condition off. So the only remaining relevant condition is the Time,h condition.
Name Min, % Max, % UL, MiB Time, h Action seed-48h 1000 1000 0 -1 Stop - Stop torrent(s) either after 48 hours of seeding or as soon as the ratio becomes 1.5. The Time,h condition sets the maximum seed duration in hours. However, the action will be triggered before 48 hours have been passed if the torrent reaches a 1.5 ratio.
Name Min, % Max, % UL, MiB Time, h Action seed-r48h 150 0 0 48 Stop - Stop torrent(s) as soon as the download is complete.
Name Min, % Max, % UL, MiB Time, h Action seed-stop 0 0 0 -1 Stop - Throttle upload speed to 256KiB/s as soon as the download is complete. This configuration assumes that the
Name Min, % Max, % UL, MiB Time, h Action throttle-up 0 0 0 -1 Set channel to up256
-
-
Once done, click Ok to save the configuration.
¶ Configure Ratio Rules
- Create your ratio group by following the above mentioned guide.
- Find the
Ratio Rulesoption at the top menu bar and click on it.

- Let’s say we want to disable seeding to public bittorrent trackers after reaching a certain ratio.
- We will set If to
All torrent's trackers are public.
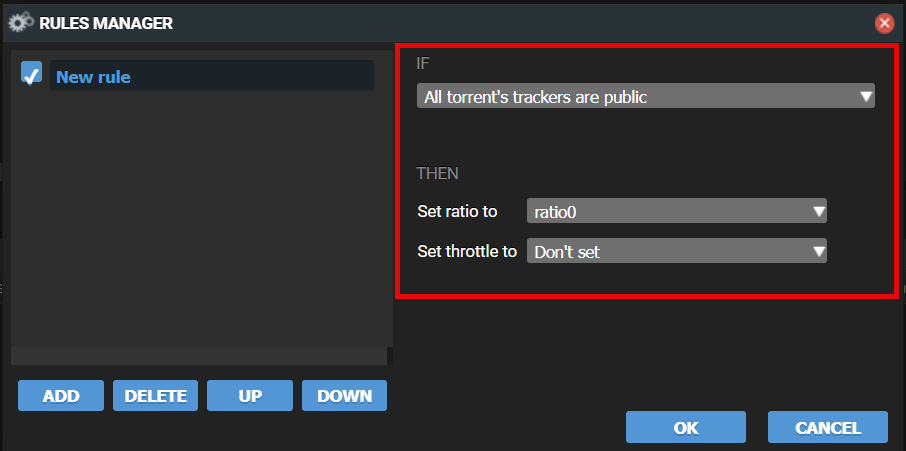
- We will set
Set ratio toto the ratio group we have configured in step 1.
In this demo image, we have set the ratio group to
ratio0. Please note that, you must configure appropiate limit for ratio group 0 at step 1. It is not configured by default.
¶ Configure Ratio Rules For Arr Apps
- Create your ratio group by following the above mentioned guide.
- Find the
Ratio Rulesoption at the top menu bar and click on it.

- Let’s say we want to set ratio group to each torrent based on their label.
- We will set If to
Torrent Label Contains.
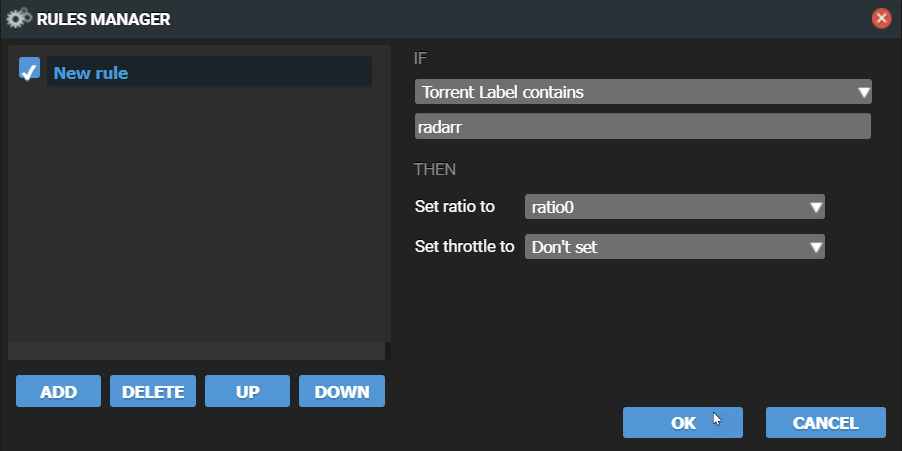
- We will set
Torrent Label Containsto the ratio group we have configured in step 1.
You must set a unique label while configuring rtorrent as a download client in your Arr App.
In this demo image, we have set the ratio group to
ratio0. Please note that, you must configure appropiate limit for ratio group 0 at step 1. It is not configured by default.
¶ Limiting Upload/Download Speed Limit
Although, you can set upload/download speed limit easily using the ruTorrent interface, the limits will get reset automatically when rTorrent is restarted. To properly implement speed limit in rTorrent/ruTorrent you need to modify the rtorrent.rc file. You can easily do that by following these simple steps -
- Connect to your GigaDrive FTP server and make sure hidden files are visible. For more information refer to this guide.
- Once you are connected, simply navigate to
/storage/.appdata/rtorrent/and there you will find thertorrent.rcfile. - Simply open the file using any text editor like Notepad++ and add the following lines to your rc file.
# Global upload and download rate in KiB. "0" for unlimited.
throttle.global_down.max_rate.set_kb = 0
throttle.global_up.max_rate.set_kb = 0
Make sure to replace
= 0to your desired limits in KiB/s. For example,
If you want to limit the download speed to 1MiB/s, then you need to insertthrottle.global_down.max_rate.set_kb = 1024.
If you want to set upload speed to 2MiB/s, then you need to insert
throttle.global_up.max_rate.set_kb = 2048
You can use a handly tool like this one to convert between various byte units.
- Once you are done editing the rc file, you need to reboot rtorrent from your dashboard for the settings to take effect. Refer to this tutorial if you need a tutorial for rebooting apps.
¶ Creating archives
- Switch to the File Manager tab in the tabs panel.
- Locate the file/folder(s) and select them. To select multiple file/folder(s) press and hold the CTRL button while selecting.
- Right click and select Create > New Archive.

- You should get a popup window like the following
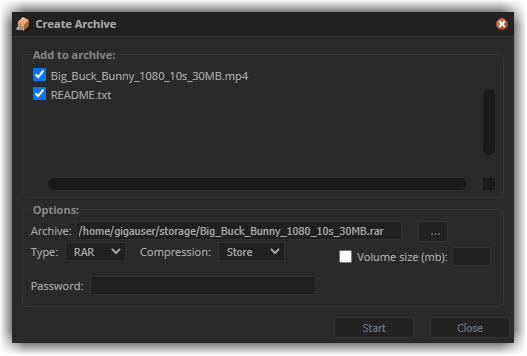
- Set appropiate options and click Start.
- Archive: If you want to change the destination path of the archive, click the icon and select a different path.
- Type: You can choose among RAR, ZIP, TAR, GZIP and BZIP2 types.
- ZIP: Zip archives can be extracted on most platforms using native tools, so it is an ideal choice for sending an archive to a non-technical user who would be uncomfortable with installing third-party archive software such as 7-Zip. The compression level isn’t as good as more advanced algorithms and it doesn’t support unix permissions.
- RAR: If you are sure that the receiver of your archive has winrar or any other software with the ability to unpack Rar archives, then it is recommended to choose RAR, which supports more functions and higher compression than Zip.
- TAR: A tar file, often called a tarball, is a collection of files wrapped up in one single file. In this format the directory structure is stored, but the content isn’t compressed. Moreover all rights and the owner is stored in a tar archive.
- GZIP & BZIP2: gzip and bzip2 archives are basically tar archives compressed with gzip and bzip2 respectively. These are ideal for use on linux systems (and by extension for sharing files with linux users) because the tar, gzip and bzip2 tools are largely ubiquitous on the platform, and because the .tar format has full support for unix permissions and other platform-specific properties. The choice between gzip and bzip2 to compress the tar archive is mainly a decision about speed versus compression ratio, with bzip2 delivering smaller files but with a much slower compression speed. The disadvantages of these formats include less compatibility with Windows and the (potential) need to uncompress the entire archive to extract a single file.
- Compression: You can choose among Store, Fastest, Fast, Normal, Good and Best methods. Best provides highest, but slowest compression, Fastest compresses poorly, but is very fast, Store adds files to archive with maximum possible speed, but without any compression. Fastest might be more suitable for daily backups, Best for Internet distribution, Normal for everyday use like compressing email attachments. Compression level is applicable for ZIP and RAR archive format only.
- Volume size (mb): If you wish to create volumes i.e create a multipart archive, enter the size of a single volume (in Mb) here. This is applicable for RAR archive format only.
- Password: Set a password to encrypt archived files. This is applicable for RAR archive format only.
- Once done you will get the following popup window.
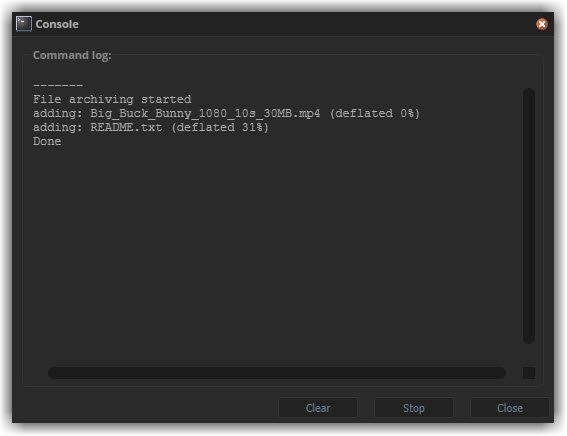
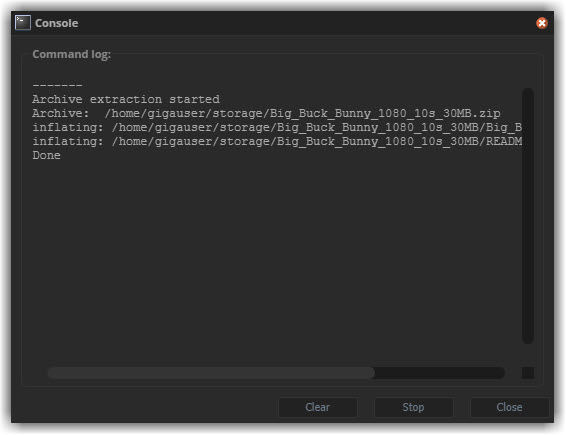
¶ Extracting archived files
- Switch to the File Manager tab in the tabs panel.
- Locate the archive file and right click on it.
- Select Extract here or Extract all to extract.

- Once done you will get the following popup window.
¶ Unpacking archived files automatically
- Click the Settings button which is located at the top menu bar and switch to the Unpack tab.
- You will get a popup window like the following.
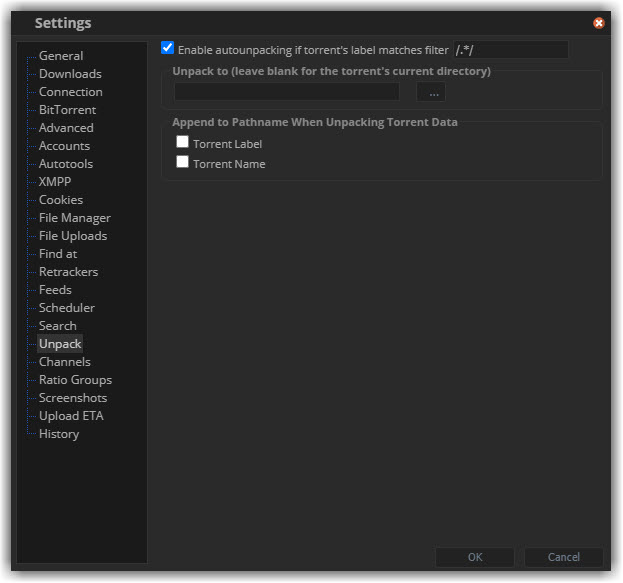
- Check the option Enable autounpacking if torrent’s label matches filter
- By default it will match and auto unpack all new torrents. If want to match certains labels add the following to the first textbox
/.*(label-1|label-2|label-3).*/i. Replace label-1, label-2, label-3 with actual label names. - Unpack To: Leave blank to use the torrent’s current directory. Otherwise, click to choose and set a different directory path.
- Torrent Label: Enabling this option will extract the torrent data in a folder having the same name as the torrent’s label.
- Torrent Name: Enabling this option will extract the torrent data in a folder having the same name as the torrent’s name.
- If you enable both the above options, you will end up with a directory structure as following
. └── UnpackDirectory ├── Label-1 │ ├── Torrent-Name-1 │ └── Torrent-Name-2 └── Label-2 ├── Torrent-Name-3 └── Torrent-Name-4 - By default it will match and auto unpack all new torrents. If want to match certains labels add the following to the first textbox
- Click Ok to save the configuration.
¶ Applying labels to the new torrents automatically
- Click the Settings button which is located at the top menu bar and switch to the Autotools tab.
- You will get a popup window like the following.
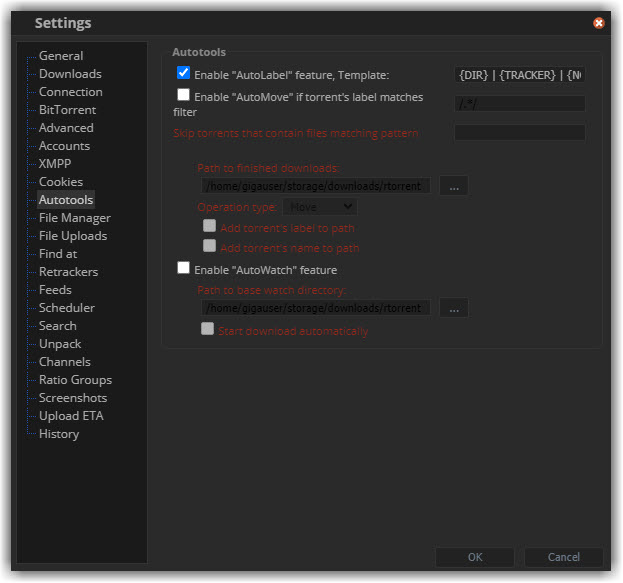
- Check the option Enable AutoLabel feature and enter any of the following template variable(s) or a combination of them in the Template field:
- {DIR}: If the default download directory is set to
/home/gigauser/storage/downloads/rtorrent/in Settings > Downloads and a new torrent is saved as/home/gigauser/storage/downloads/rtorrent/Sample/Media/media.mp4then this variable will be replaced bySample/Media. - {TRACKER}: This variable will be replaced by the tracker name.
- {NOW}: This variable will be set to the current date using strftime() function. Default format is %Y-%m-%d. It is possible to set custom format using syntax:
{NOW[:<format>]}, for example:{NOW:%Y-%m-%d %H:%M}will be replaced by2020-11-17 11:08and{NOW:%Y}will be replaced by2020.
- {DIR}: If the default download directory is set to
- Click Ok to save the configuration.
¶ Moving torrent data files automatically based on torrent label
-
Click the Settings button which is located at the top menu bar and switch to the Autotools tab.
-
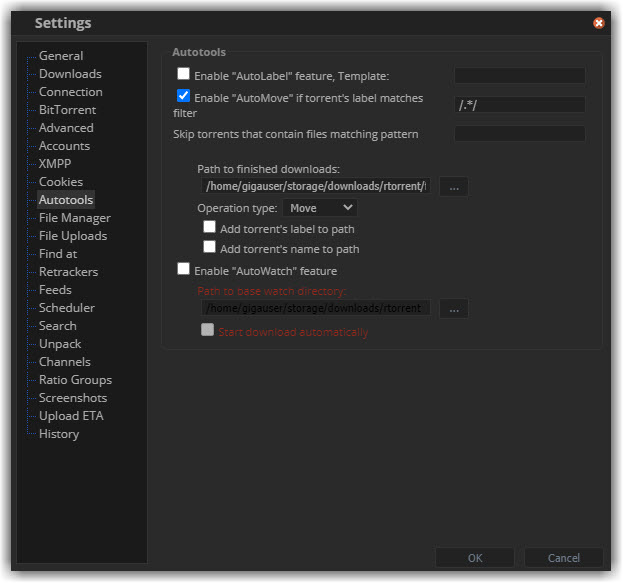
You will get a popup window like the following.
-
Check the option Enable AutoMove feature and enter a regular expression in the text field nex to it. The default expression
/.*/will match torrents with any label. To match certain labels/.*(label-1|label-2|label-3).*/i. Replace label-1, label-2, label-3 with actual label names.- Skip torrents that contain files matching pattern: Enter a regular expression pattern to exlude torrents containing certain files
- Operation type: You can choose among Move, Copy, Soft link, Hard-link types. Hard link is the preferred type if you want to keep the files available at both location (Default download directory and finished download directory).
- Add torrent’s label to path: Enabling this option will move the torrent data in a folder having the same name as the torrent’s label.
- Add torrent’s name to path: Enabling this option will move the torrent data in a folder having the same name as the torrent’s name.
-
Click Ok to save the configuration.
¶ Automatically Deleting files that are not tied to rTorrent instance
ruTorrent does not always delete the source files when you remove a torrent. To remove files that are not tied to rTorrent/ruTorrent you need to modify the rtorrent.rc file. You can easily do that by following these simple steps -
- Connect to your GigaDrive FTP server and make sure hidden files are visible. For more information refer to this guide.
- Once you are connected, simply navigate to
/storage/.appdata/rtorrent/and there you will find thertorrent.rcfile. - Simply open the file using any text editor like Notepad++ and add the following lines to your rc file.
schedule2 = untied_directory,5,5,"remove_untied="
- Once you are done editing the rc file, you need to reboot rtorrent from your dashboard for the settings to take effect. Refer to this tutorial if you need a tutorial for rebooting apps.
¶ Sharing files
- Switch to the File Manager tab in the tabs panel.
- Locate the file you want to share. Right click on it and select Share.

- Set Duration in hours and a Password (Optional but recommended) and click Add to create the share.
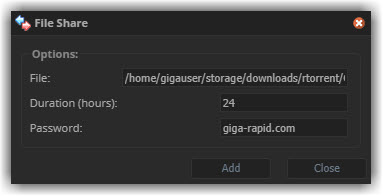
- You will get the following message in the Log tab.

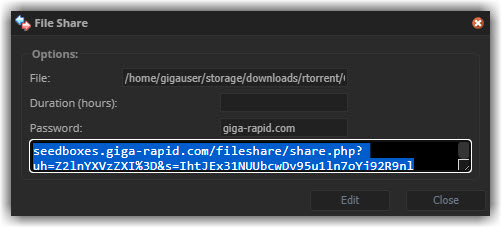
- Switch to the File Share tab. Right click on your share and select Edit.

- Double-click on the textarea field to select the link and press CTRL + C copy it.
¶ Finding the Info Hash of a Torrent in ruTorrent
To locate the info hash of a torrent in the ruTorrent/rTorrent interface, follow these steps:
- Log in to the ruTorrent web interface.
- Select one of the torrents by clicking on its name.
- Navigate to the General tab, where you’ll see a field labeled Hash:
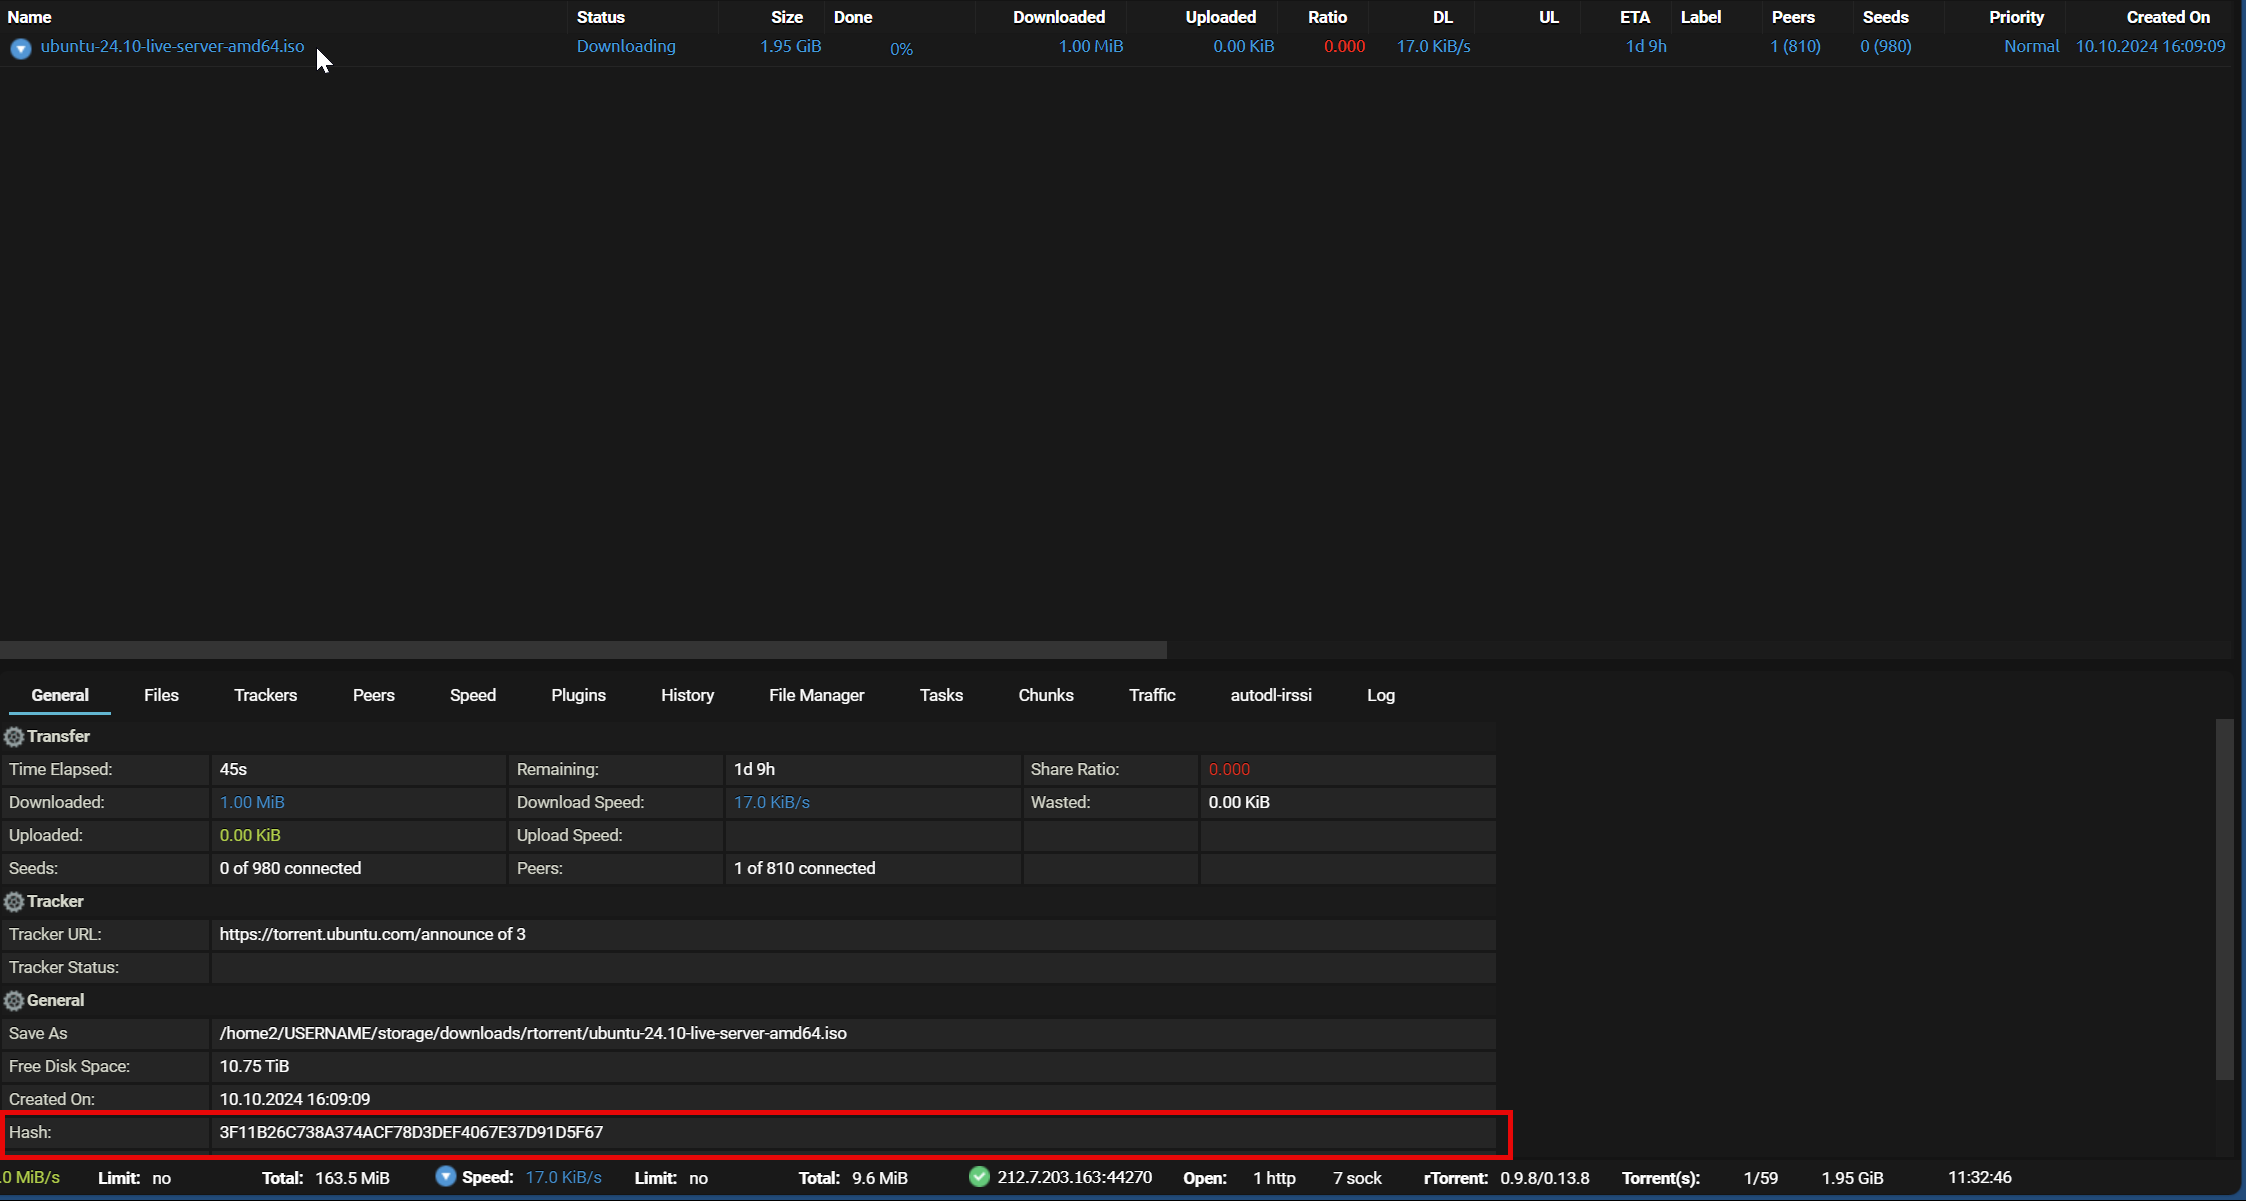
- The value in the Hash field is the unique identifier (info hash) of your torrent.
¶ Troubleshooting rTorrent
¶ Enable Debug Logging
If you encounter unusual issues with your rTorrent app, enabling debug logging can help identify the root cause. To do so:
- Log in via FTP or through the Filebrowser app.
- Go to
/storage/.appdata/rtorrent/or.appdata/rtorrent/. - Open the
.rtorrent.rcfile and uncomment lines that begin with#log.. - For example, change the line:
to:#log.add_output = "info", "rtorrent"
This change will uncomment the line and enable logging oflog.add_output = "info", "rtorrent"INFOlevel messages. - If unsure which lines to uncomment (i.e., remove the leading
#), it’s recommended to uncomment all logging-related lines.
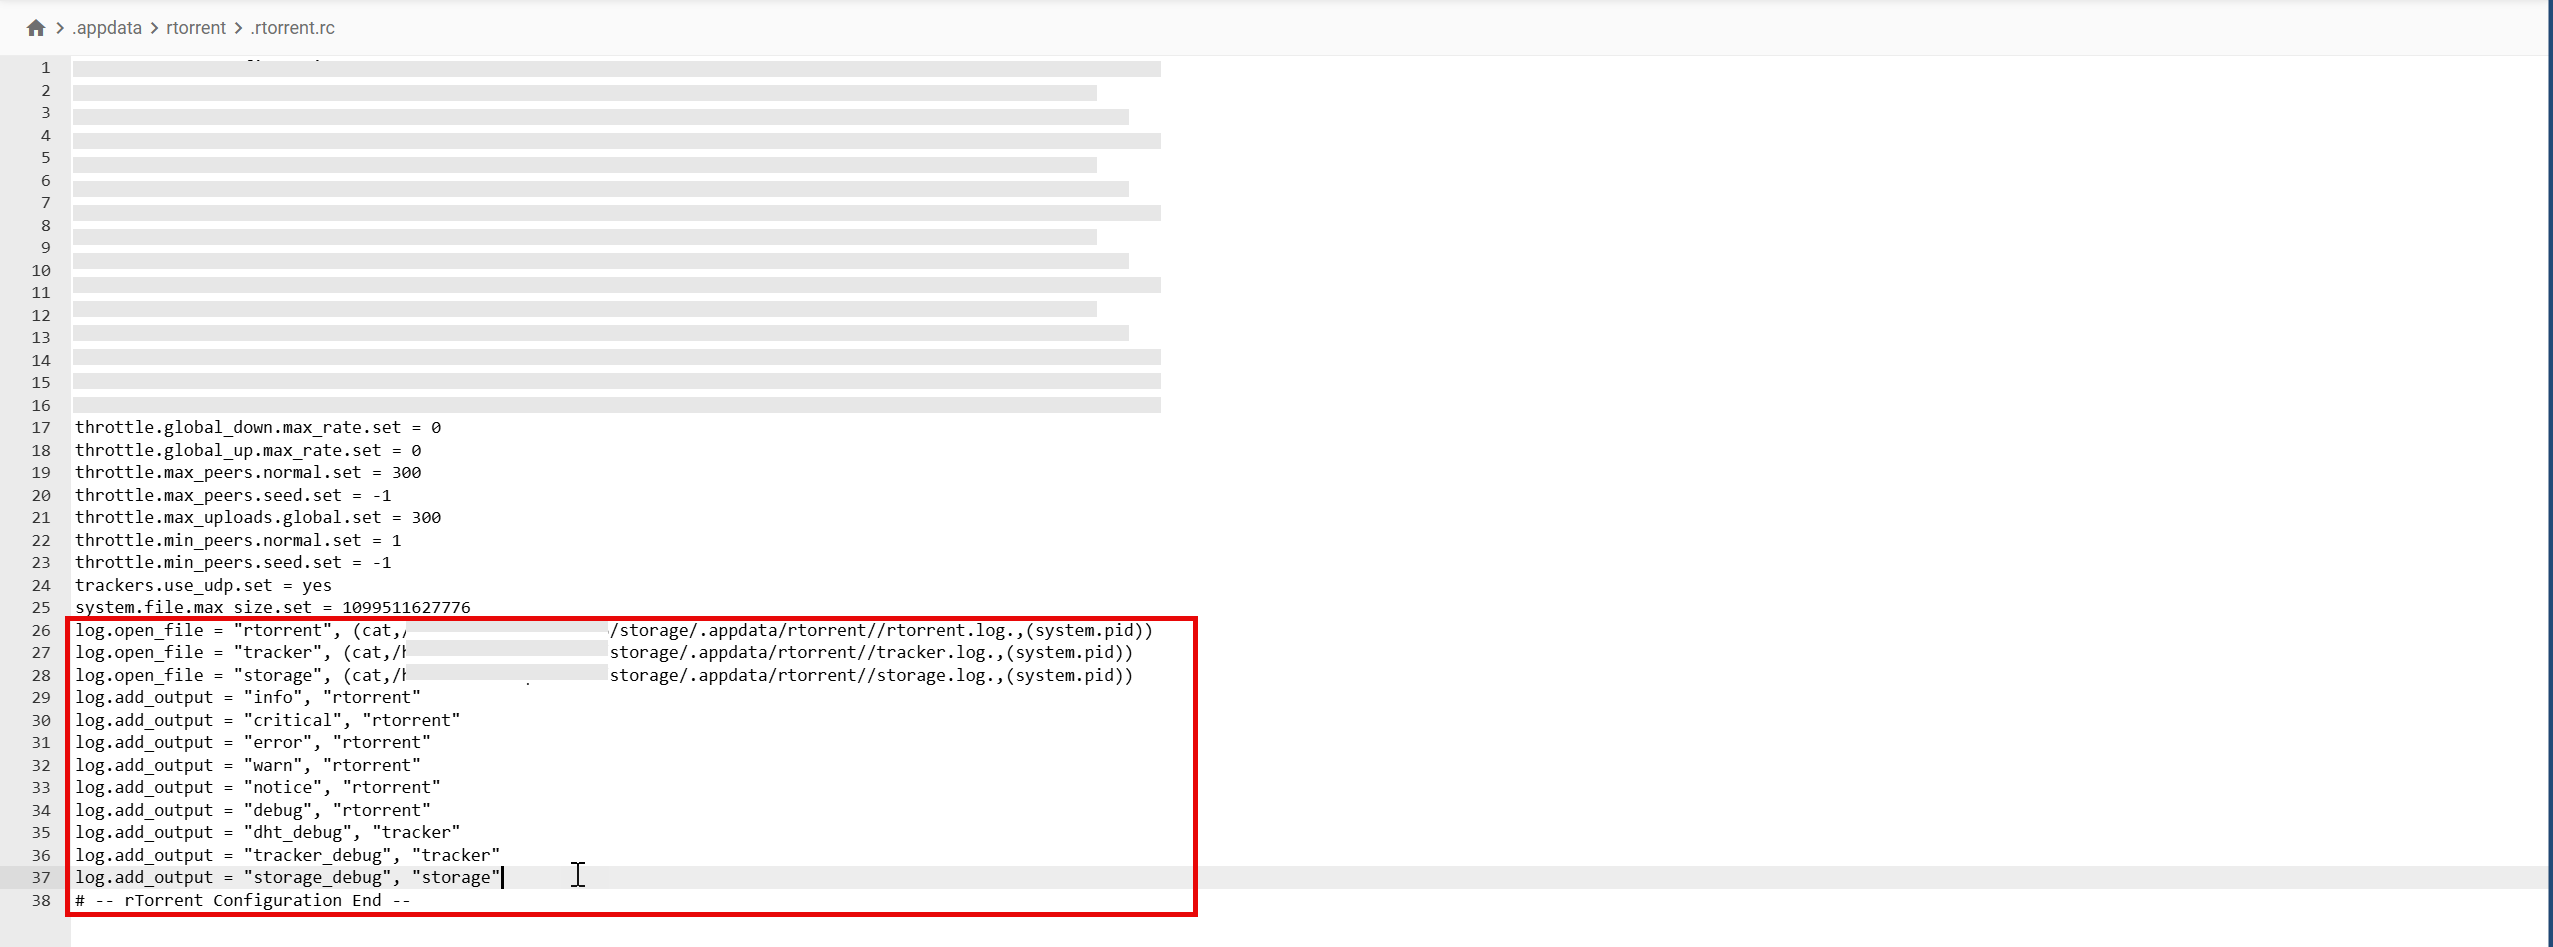
- After making changes, restart rTorrent from the Applications page.
- Refresh FTP/Filebrowser to view log files that will appear in the
/storage/.appdata/rtorrentdirectory.
¶ Disabling Debug Logging
After gathering sufficient logs to troubleshoot the issue, it’s recommended to disable debug logging, as these logs can become large in size taking significant disk space due to their verbosity.
- To turn off logging, comment out the lines starting with log. by adding a
#at the beginning of each line, then save the.rtorrent.rcfile. - Restart rTorrent from your dashboard to apply the changes.
¶ Locating Errors for a Specific Torrent
- First, enable debug logging.
- Locate the info hash of the specific torrent with issues.
- Open any
.logfile and search for the info hash from step 2. - You’ll find error messages and information logs related to that torrent within the log file.
If you need assistance with analysis, please reach out to our support team.