¶ Intro
FlareSolverr is a proxy server to bypass Cloudflare protection.
¶ Availability
FlareSolverr is available on all of our GigaDrive Plans that supports OpenSSH app.
¶ How It Works
FlareSolverr starts a proxy server and it waits for user requests in an idle state using few resources. When some request arrives, it uses puppeteer with the stealth plugin to create a headless browser (Firefox). It opens the URL with user parameters and waits until the Cloudflare challenge is solved (or timeout). The HTML code and the cookies are sent back to the user, and those cookies can be used to bypass Cloudflare using other HTTP clients.
NOTE: Web browsers consume a lot of memory. If you are running FlareSolverr on a machine with few RAM, do not make many requests at once. With each request a new browser is launched.
It is also possible to use a permanent session. However, if you use sessions, you should make sure to close them as soon as you are done using them.
¶ Installing FlareSolverr
- Navigate to the Application Manager page and search for
flaresolverr. - Click icon to open the installation window and tap Install to start the installation process.
- Once the installation is complete, click icon to open the Access Info page. Then click Go To Application to access
flaresolverr. - You can copy the URL from your browser’s address bar for usage on other apps.
¶ Installing FlareSolverr via SSH
cd /config
sudo mkdir -p flaresolverr && cd flaresolverr
sudo wget https://github.com/FlareSolverr/FlareSolverr/releases/download/v2.2.10/flaresolverr-v2.2.10-linux-x64.zip
sudo bsdtar --strip-components=1 -xvf flaresolverr-*-linux-x64.zip
sudo rm -rf flaresolverr-*-linux-x64.zip
sudo apt -qy --no-install-recommends install libgtk-3-0 libdbus-glib-1-2 libx11-xcb-dev libasound2 libxtst6 libnss3
This tutorial may contained outdated download link to flaresolverr. Please copy latest download link of flaresolverr from this page - https://github.com/FlareSolverr/FlareSolverr/releases and use it with the
sudo wgetcommand above.
- Run the following command to verify the installation.
PORT=7000 ./flaresolverr
On successful installation, you will get the following output. Then press CTRL+C to exit.
2021-12-28T12:49:04+00:00 INFO FlareSolverr v2.2.0
2021-12-28T12:49:04+00:00 INFO Testing web browser installation...
2021-12-28T12:49:14+00:00 INFO FlareSolverr User-Agent: Mozilla/5.0 (X11; Linux x86_64; rv:97.0) Gecko/20100101 Firefox/97.0
2021-12-28T12:49:14+00:00 INFO Test successful
2021-12-28T12:49:14+00:00 INFO Listening on http://0.0.0.0:7000
- Create a linux service file for flaresolverr.
sudo mkdir -p /etc/services.d/flaresolverr && \
cd /etc/services.d/flaresolverr && \
sudo touch /etc/services.d/flaresolverr/run && \
sudo chmod +x /etc/services.d/flaresolverr/run && \
sudo nano /etc/services.d/flaresolverr/run
- Paste the following text when prompted and press CTRL+O and ENTER, followed by CTRL+X.
#!/usr/bin/with-contenv bash

export PORT=7000
export LOG_LEVEL=info
export LOG_HTML=false
export HOME=/config

cd /config/flaresolverr && \
exec s6-setuidgid YOUR_SSH_USERNAME ./flaresolverr > flaresolverr.log 2>&1
Make sure to replace YOUR_SSH_USERNAME with your actual SSH username.
-
Now simply reboot your SSH application to install the subsonic linux service.
-
Return to your GigaDrive Dashboard and click the Access Info button of
openssh-debianapp. -
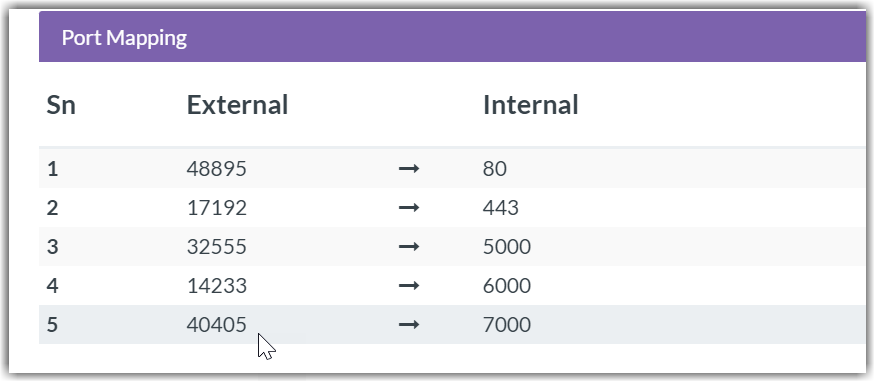
Scroll down to the
Port Mappingsection. -
Note down the
External Portcorresponding to the internal port 7000 as we have usedPORT=7000while creating the linux service. If you want to use any other internal port make sure it is listed within thePort Mappingsection.

-
Here we have port 40405 as the external port for the internal port 7000. So the Access URL would be
http://<IP.ADDRESS>:40405. Open this URL on your browser to access flaresolverr.
Make sure to replace <IP.ADDRESS> with your actual GigaDrive IP address and replace 40405 with actual external port from your dashboard.