¶ Intro
Sonarr is a PVR for Internet users.

¶ Availability
Please check our application chart to see which GigaDrive Plans are eligible to install this application.
¶ Features
- Support for major platforms: Windows, Linux, macOS, Raspberry Pi, etc
- Full integration with SABnzbd and NZBGet
- Full integration with Kodi, Plex (notification, library update, metadata)
- Full support for specials and multi-episode releases
- And a beautiful UI
¶ Installing Sonarr
- Navigate to the Application Manager page and search for
sonarr. - Click icon to open the installation window and tap Install to start the installation process.
- Once the installation is complete, click icon to open the Access Info page. Then click Go To Application to access
sonarr.
Username and password configuration is no longer necessary. Our automated installer will configure that automatically for you. So, feel free to skip the following steps.
- Navigate to Settings > General and set Authentication to
Forms (Login page)under the Security section.
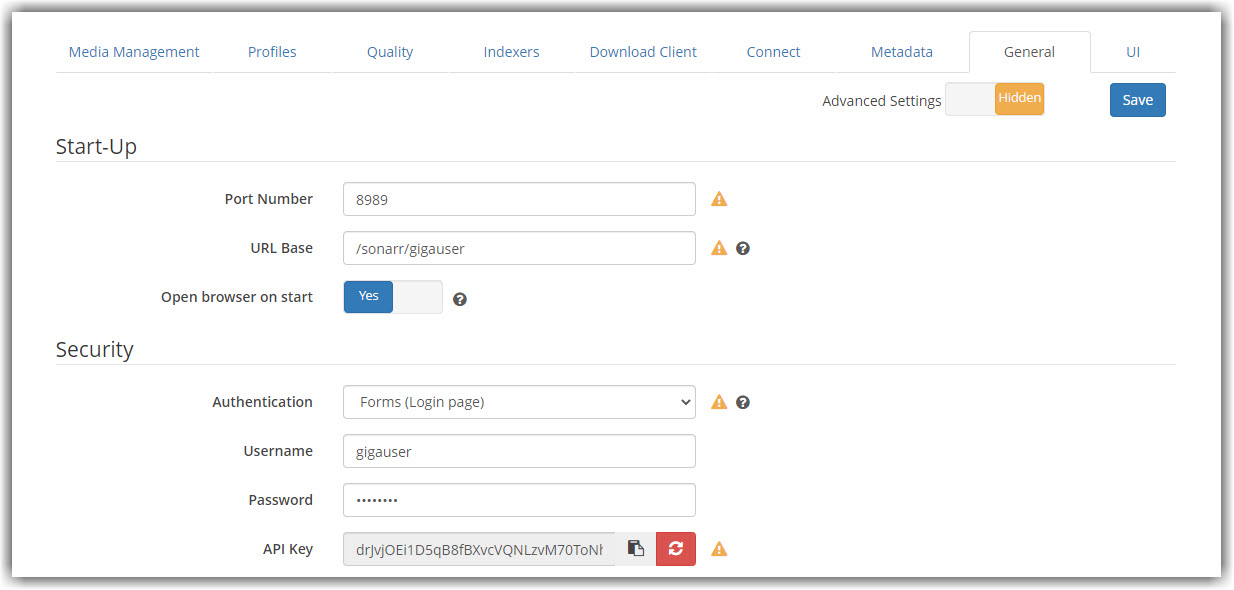
- Set Username and Password as per your preference and DO NOT change url base or port number.
- Finally, click the top-left Save Changes button.
¶ Connecting rTorrent
- Navigate to the Application Manager page and search for
rtorrent. - Click icon to open the Access Info page and note down Hostname, URL Base, Username and Password which will be used in subsequent steps.
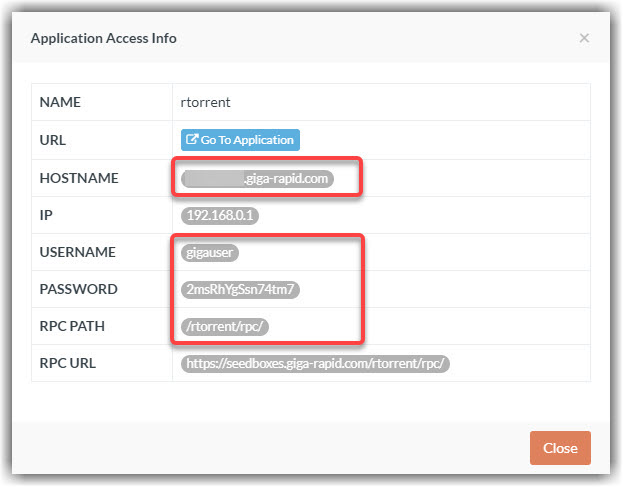
- Navigate to Settings > Download Clients and Turn on Advanced settings.
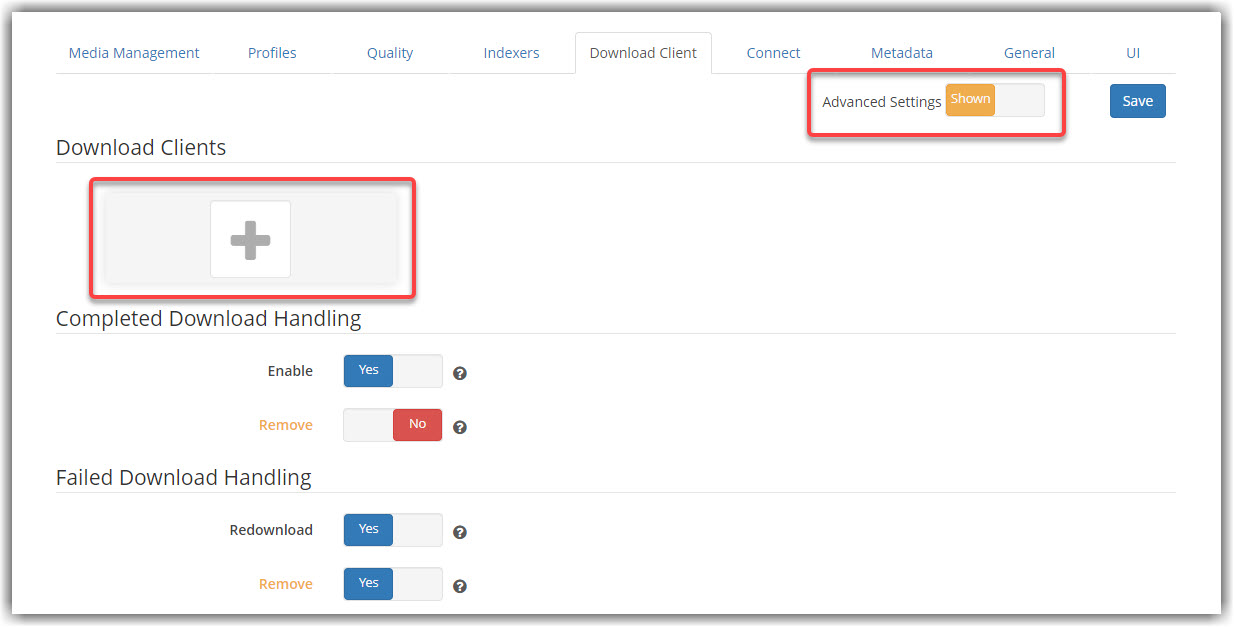
- Click the plus sign to add your client. Then select rtorrent and fill in the values you have got from step 2 as following.
- Name:
rtorrent - Enable: Yes
- Host:
rTorrent Hostname - Port:
443 - Url Path :
/rtrpc/or/rt/plugins/httprpc/action.php - Username:
rTorrent Username - Password:
rTorrent Password - Use SSL: Yes
- Name:
- Click the plus sign under Remote Path Mappings section (Make sure Advanced Settings is turned on as mentioned on step 3)

- Fill in the values as following.
- Host:
rTorrent Hostname - Remote Path:
/homeX/USERNAME/storage/downloads/rtorrent - Local Path:
/storage/downloads/rtorrent
- Host:
This configuration assumes
/homeX/USERNAME/storage/downloads/rtorrentis the default download directory set in rTorrent/ruTorrent. If your default download directory is different in rTorrent/ruTorrent make sure to adjust the paths and replaceUSERNAMEandXaccordingly. You can easily get the remote path from rTorrent settings and local path from your FTP client.
- Click Test and Save.
¶ Connecting Deluge
- Navigate to the Application Manager page and search for
deluge. - Click icon to open the Access Info page and note down Hostname, URL Base, Username and Password which will be used in subsequent steps.
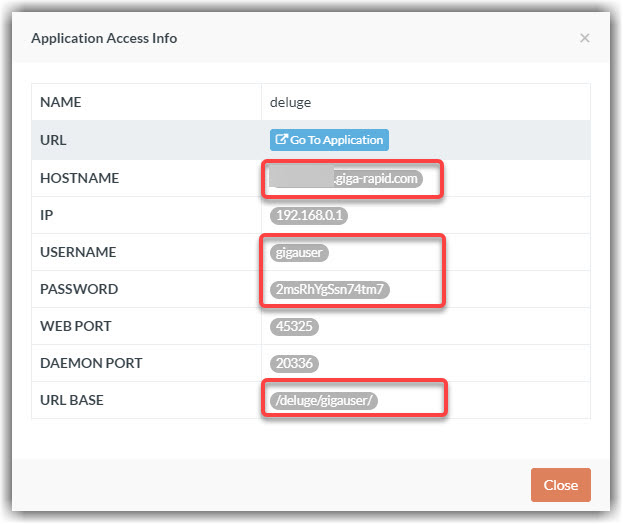
- Navigate to Settings > Download Clients and Turn on Advanced settings.
- Click the plus sign to add your client. Then select deluge and fill in the values you have got from step 2 as following.
- Name:
deluge - Enable: Yes
- Host:
Deluge Hostname - Port:
443 - Url Base :
Deluge URL Base - Username:
Deluge Username - Password:
Deluge Password - Use SSL: Yes
- Name:
- Click the plus sign under Remote Path Mappings section (Make sure Advanced Settings is turned on as mentioned on step 3)
- Fill in the values as following.
- Host:
Deluge Hostname - Remote Path:
/homeX/USERNAME/storage/downloads/deluge - Local Path:
/storage/downloads/deluge
- Host:
This configuration assumes
/homeX/USERNAME/storage/downloads/delugeis the default download directory set in deluge. If your default download directory is different in deluge make sure to adjust the paths and replaceUSERNAMEandXaccordingly. You can easily get the remote path from deluge settings and local path from your FTP client.
- Click Test and Save.
¶ Connecting qBittorrent
- Navigate to the Application Manager page and search for
qbittorrent. - Click icon to open the Access Info page and note down Hostname, URL Base, Username and Password which will be used in subsequent steps.
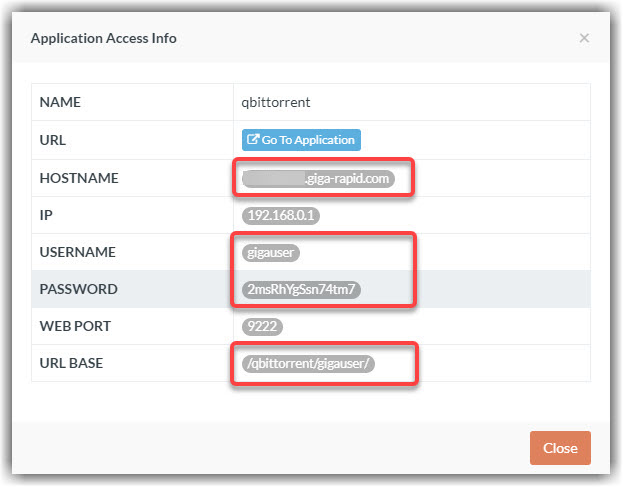
- Navigate to Settings > Download Clients and Turn on Advanced settings.
- Click the plus sign to add your client. Then select qbittorrent and fill in the values you have got from step 2 as following.
- Name:
qbittorrent - Enable: Yes
- Host:
qBittorrent Hostname - Port:
443 - Url Base :
qBittorrent URL Base - Username:
qBittorrent Username - Password:
qBittorrent Password - Use SSL: Yes
- Name:
- Click the plus sign under Remote Path Mappings section (Make sure Advanced Settings is turned on as mentioned on step 3)
- Fill in the values as following.
- Host:
qBittorrent Hostname - Remote Path:
/homeX/USERNAME/storage/downloads/qbittorrent - Local Path:
/storage/downloads/qbittorrent
- Host:
This configuration assumes
/homeX/USERNAME/storage/downloads/qbittorrentis the default download directory set in qbittorrent. If your default download directory is different in qbittorrent make sure to adjust the paths and replaceUSERNAMEandXaccordingly. You can easily get the remote path from qbittorrent settings and local path from your FTP client.
- Click Test and Save.
¶ Connecting Transmission
- Navigate to the Application Manager page and search for
transmission. - Click icon to open the Access Info page and note down Hostname, URL Base, Username and Password which will be used in subsequent steps.
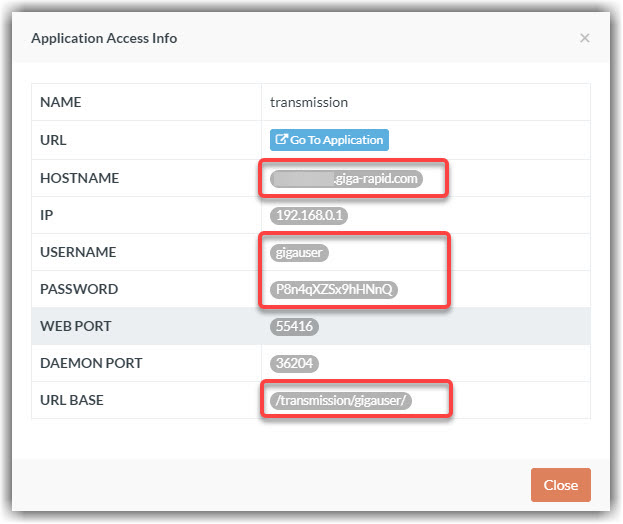
- Navigate to Settings > Download Clients and Turn on Advanced settings.
- Click the plus sign to add your client. Then select transmission and fill in the values you have got from step 2 as following.
- Name:
transmission - Enable: Yes
- Host:
Transmission Hostname - Port:
443 - Url Base :
Transmission URL Base - Username:
Transmission Username - Password:
Transmission Password - Use SSL: Yes
- Name:
- Click the plus sign under Remote Path Mappings section (Make sure Advanced Settings is turned on as mentioned on step 3)
- Fill in the values as following.
- Host:
Transmission Hostname - Remote Path:
/homeX/USERNAME/storage/downloads/transmission - Local Path:
/storage/downloads/transmission
- Host:
This configuration assumes
/homeX/USERNAME/storage/downloads/transmissionis the default download directory set in transmission. If your default download directory is different in transmission make sure to adjust the paths and replaceUSERNAMEandXaccordingly. You can easily get the remote path from transmission settings and local path from your FTP client.
- Click Test and Save.
¶ Connecting SABnzbd
- Navigate to the Application Manager page and search for
sabnzbd. - Click icon to open the Access Info page and note down Hostname, URL Base, Username and Password which will be used in subsequent steps.
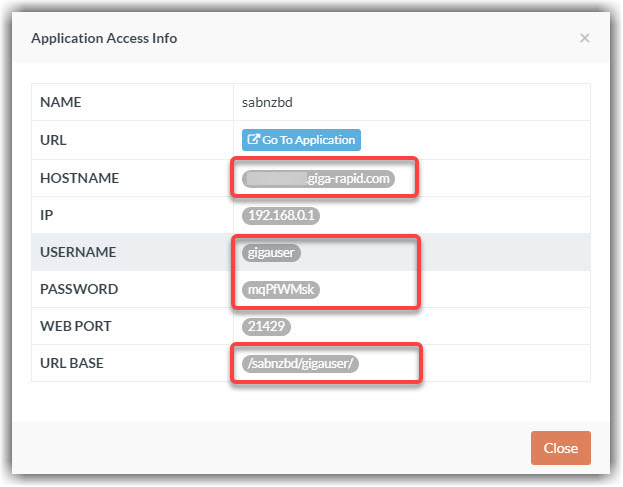
- Navigate to Settings > Download Clients and Turn on Advanced settings.
- Click the plus sign to add your client. Then select sabnzbd and fill in the values you have got from step 2 as following.
- Name:
sabnzbd - Enable: Yes
- Host:
SABnzbd Hostname - Port:
443 - Url Base :
SABnzbd URL Base - Username:
SABnzbd Username - Password:
SABnzbd Password - Use SSL: Yes
- Name:
- Click Test and Save.
¶ Connecting Nzbget
- Navigate to the Application Manager page and search for
nzbget. - Click icon to open the Access Info page and note down Hostname, URL Base, Username and Password which will be used in subsequent steps.
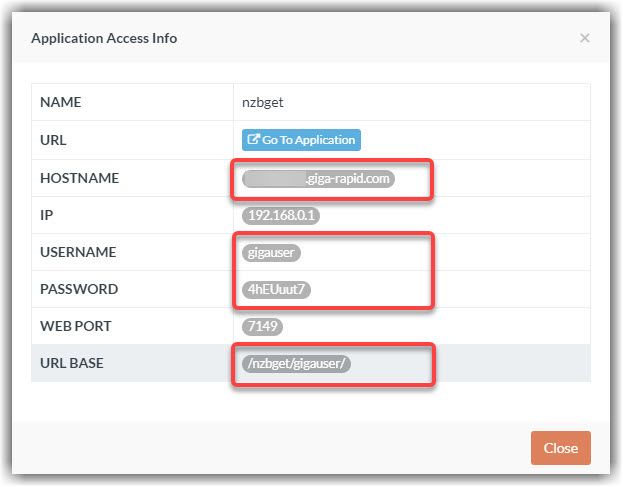
- Navigate to Settings > Download Clients and Turn on Advanced settings.
- Click the plus sign to add your client. Then select nzbget and fill in the values you have got from step 2 as following.
- Name:
nzbget - Enable: Yes
- Host:
Nzbget Hostname - Port: 443
- Url Base :
Nzbget URL Base - Username:
Nzbget Username - Password:
Nzbget Password - Use SSL: Yes
- Name:
- Click Test and Save.