¶ Intro
Cloudflared Tunnel provides you with a secure way to connect your resources to Cloudflare without a publicly routable IP address. With Tunnel, you do not send traffic to an external IP — instead, a lightweight daemon in your infrastructure (cloudflared) creates outbound-only connections to Cloudflare’s global network. Cloudflare Tunnel can connect HTTP web servers, SSH servers, remote desktops, and other protocols safely to Cloudflare. This way, your origins can serve traffic through Cloudflare without being vulnerable to attacks that bypass Cloudflare.
¶ Availability
Please check our application chart to see which GigaDrive Plans are eligible to install this application.
¶ Features
¶ 1. Secure Connection to Cloudflare’s Edge
- The tunnel creates an outbound-only connection to Cloudflare, ensuring that there’s no need to open inbound firewall ports.
- TLS encryption is used to secure the communication between your origin server and Cloudflare’s edge network.
¶ 2. Zero Trust Networking
- Offers integration with Cloudflare Zero Trust, allowing you to control which users can access specific resources using identity-based rules.
- Provides identity authentication using popular IdP (Identity Providers) like Okta, Azure AD, and others.
¶ 3. No Need for Public IP
- By using Cloudflared tunnel, there’s no requirement for a public IP address. It removes the need for traditional VPNs or NAT configurations.
¶ 4. Automatic Load Balancing
- Can distribute traffic across multiple instances of your application or servers using Cloudflare’s load balancing capabilities.
- Provides automatic failover for resilient connectivity.
¶ 5. High Availability
- Supports running multiple instances of Cloudflared tunnel across different machines to ensure redundancy and minimize downtime.
- Built-in health checks allow Cloudflare to direct traffic only to healthy tunnels.
¶ 6. Simple Deployment
- Easily deployable with a single command, simplifying the process of connecting on-premise or cloud-hosted applications to Cloudflare.
- It can be integrated with orchestration tools like Docker, Kubernetes, and cloud environments like AWS, GCP, and Azure.
¶ 7. Traffic Control and Monitoring
- Provides detailed logging and real-time traffic metrics for monitoring your tunnel’s health, performance, and security.
- Integrated with Cloudflare’s dashboard for better insights and control.
¶ 8. Custom Routing
- Allows for custom routes and paths, so you can specify which traffic should be routed through the tunnel.
- Route traffic to specific internal services or hosts based on domain names or subdomains.
¶ 9. Supports Multiple Protocols
- The tunnel supports HTTP/S and WebSocket traffic, but also can forward TCP and UDP-based protocols, making it versatile for various application needs.
¶ 10. Local Development Preview
- Developers can use Cloudflared to securely expose a local application or environment to the internet, for testing, demos, or collaborative purposes without complex configuration.
¶ 11. DNS Integration
- Automatically configures DNS settings for the tunnel, making it easier to expose services securely using custom domains managed by Cloudflare.
¶ 12. Flexible Access Controls
- Integrates with Cloudflare Access for fine-grained access controls, allowing policies based on identity, device posture, or other attributes.
¶ 13. Fast and Low-Latency Connections
- Leverages Cloudflare’s global network for low-latency access and performance, ensuring that traffic between the user and your application is optimally routed.
¶ 14. DDoS Protection
- Benefit from Cloudflare’s DDoS protection for applications served through the tunnel, safeguarding your infrastructure from malicious traffic.
These features make Cloudflared tunnel an essential tool for securely and reliably exposing private applications to the web or internal networks via Cloudflare’s edge network.
¶ Installing Cloudflared
- Open Cloudflare Zero Trust Dashboard.
- Navigate to
Network>Tunnelsand then clickCreate A Tunnel.
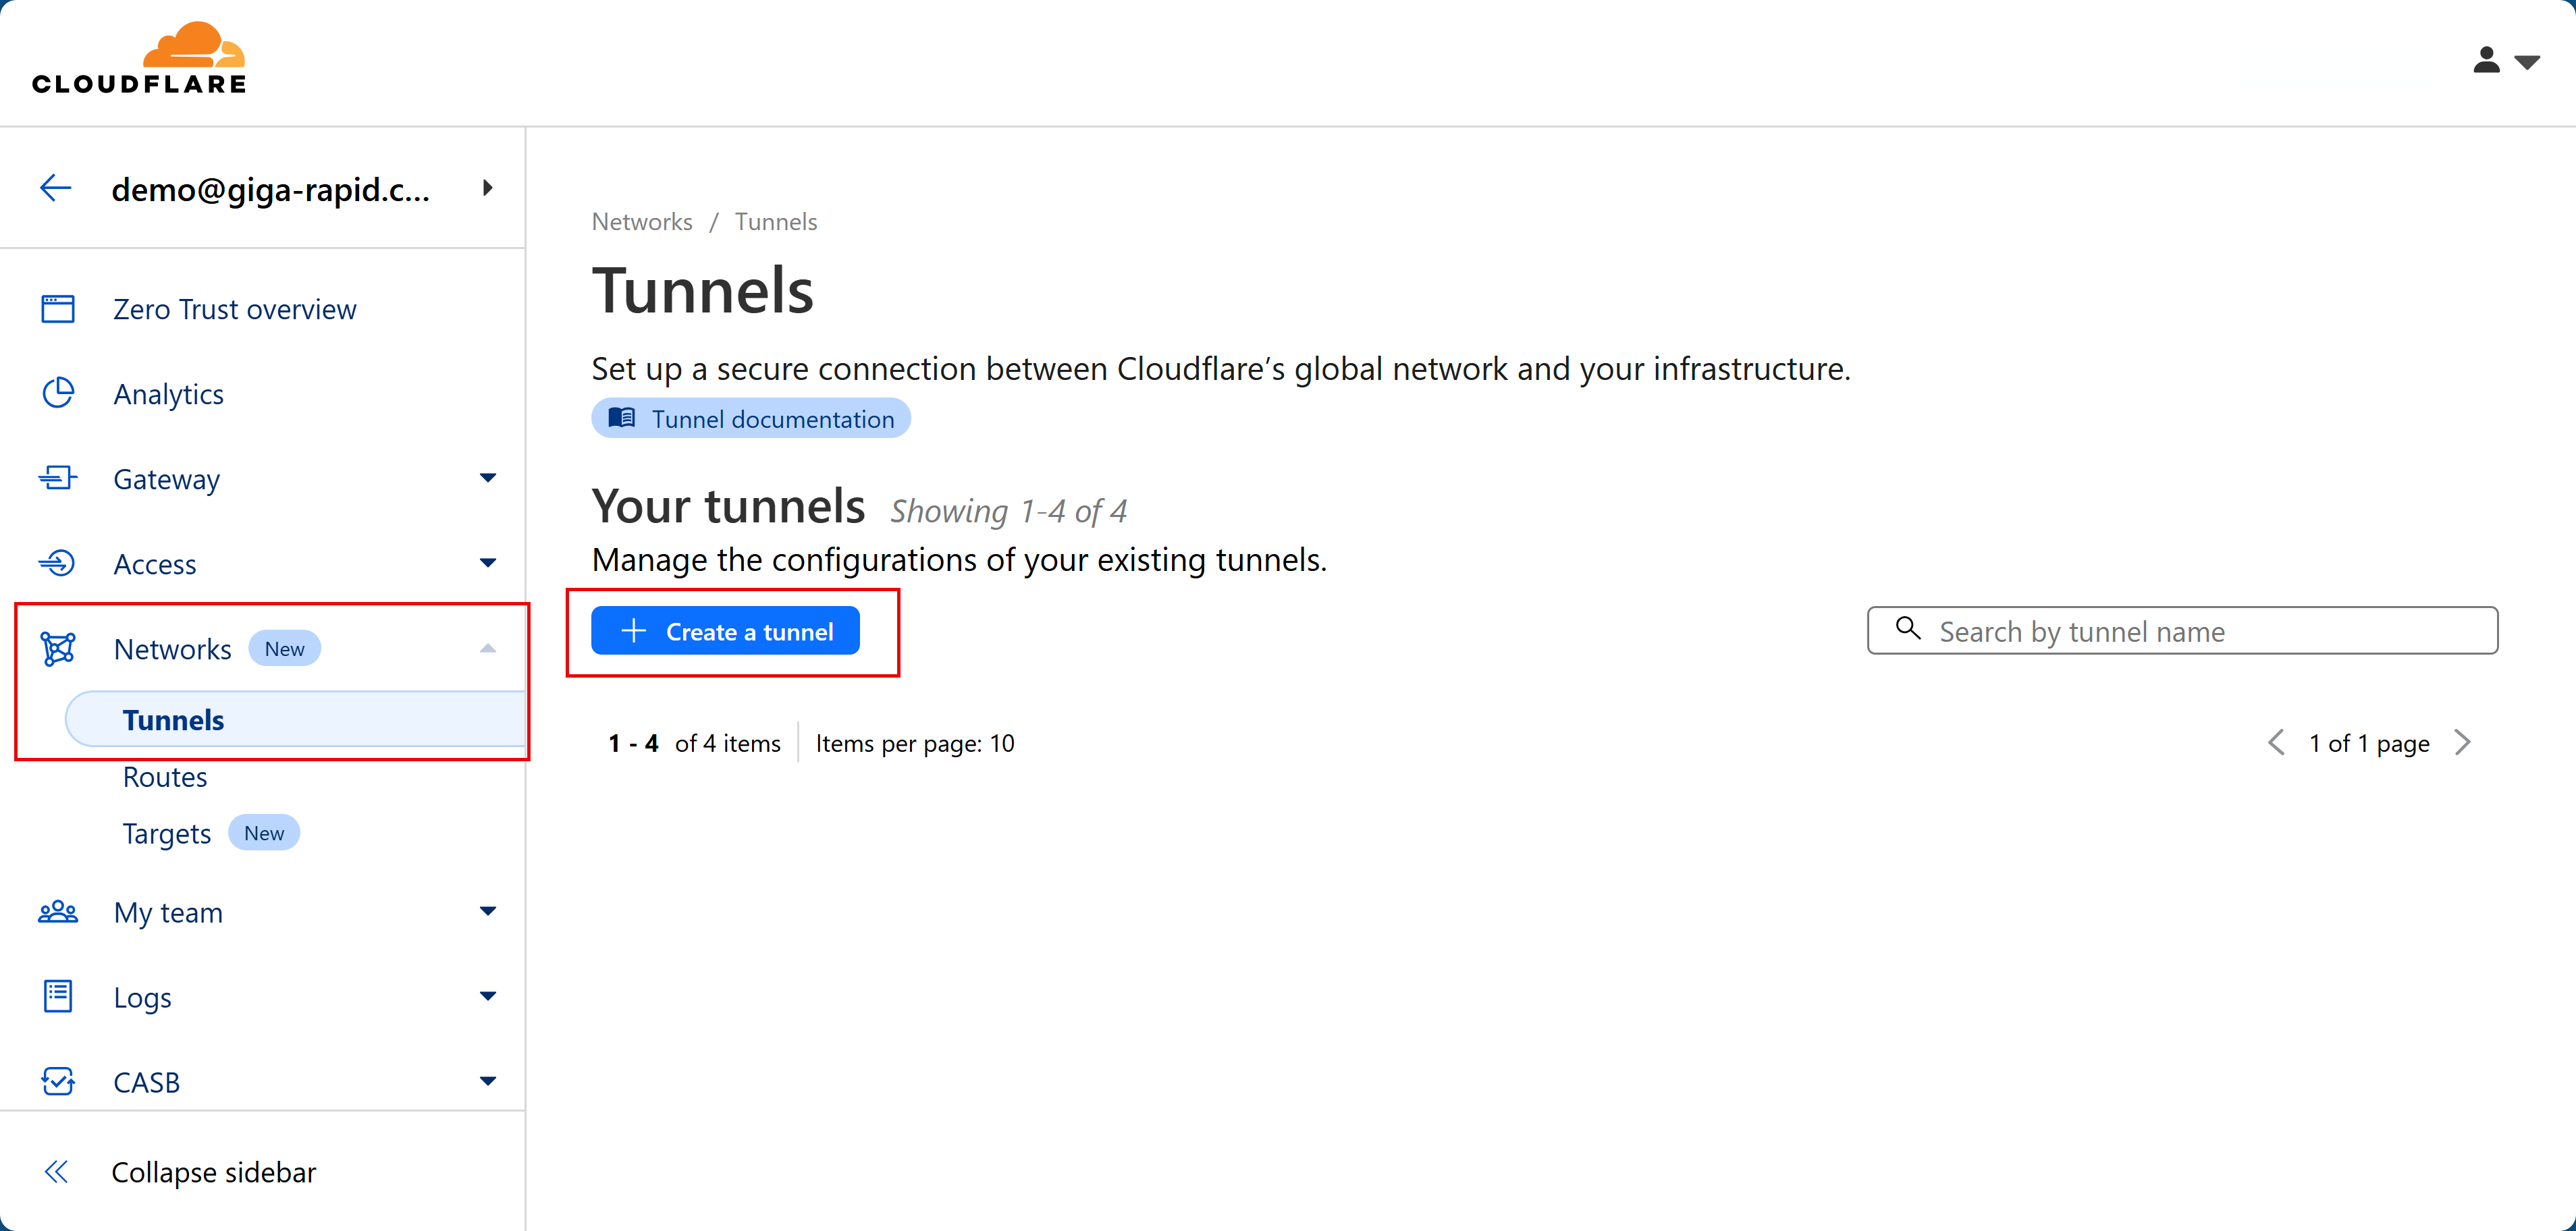
- Choose
Cloudflaredand click Next.
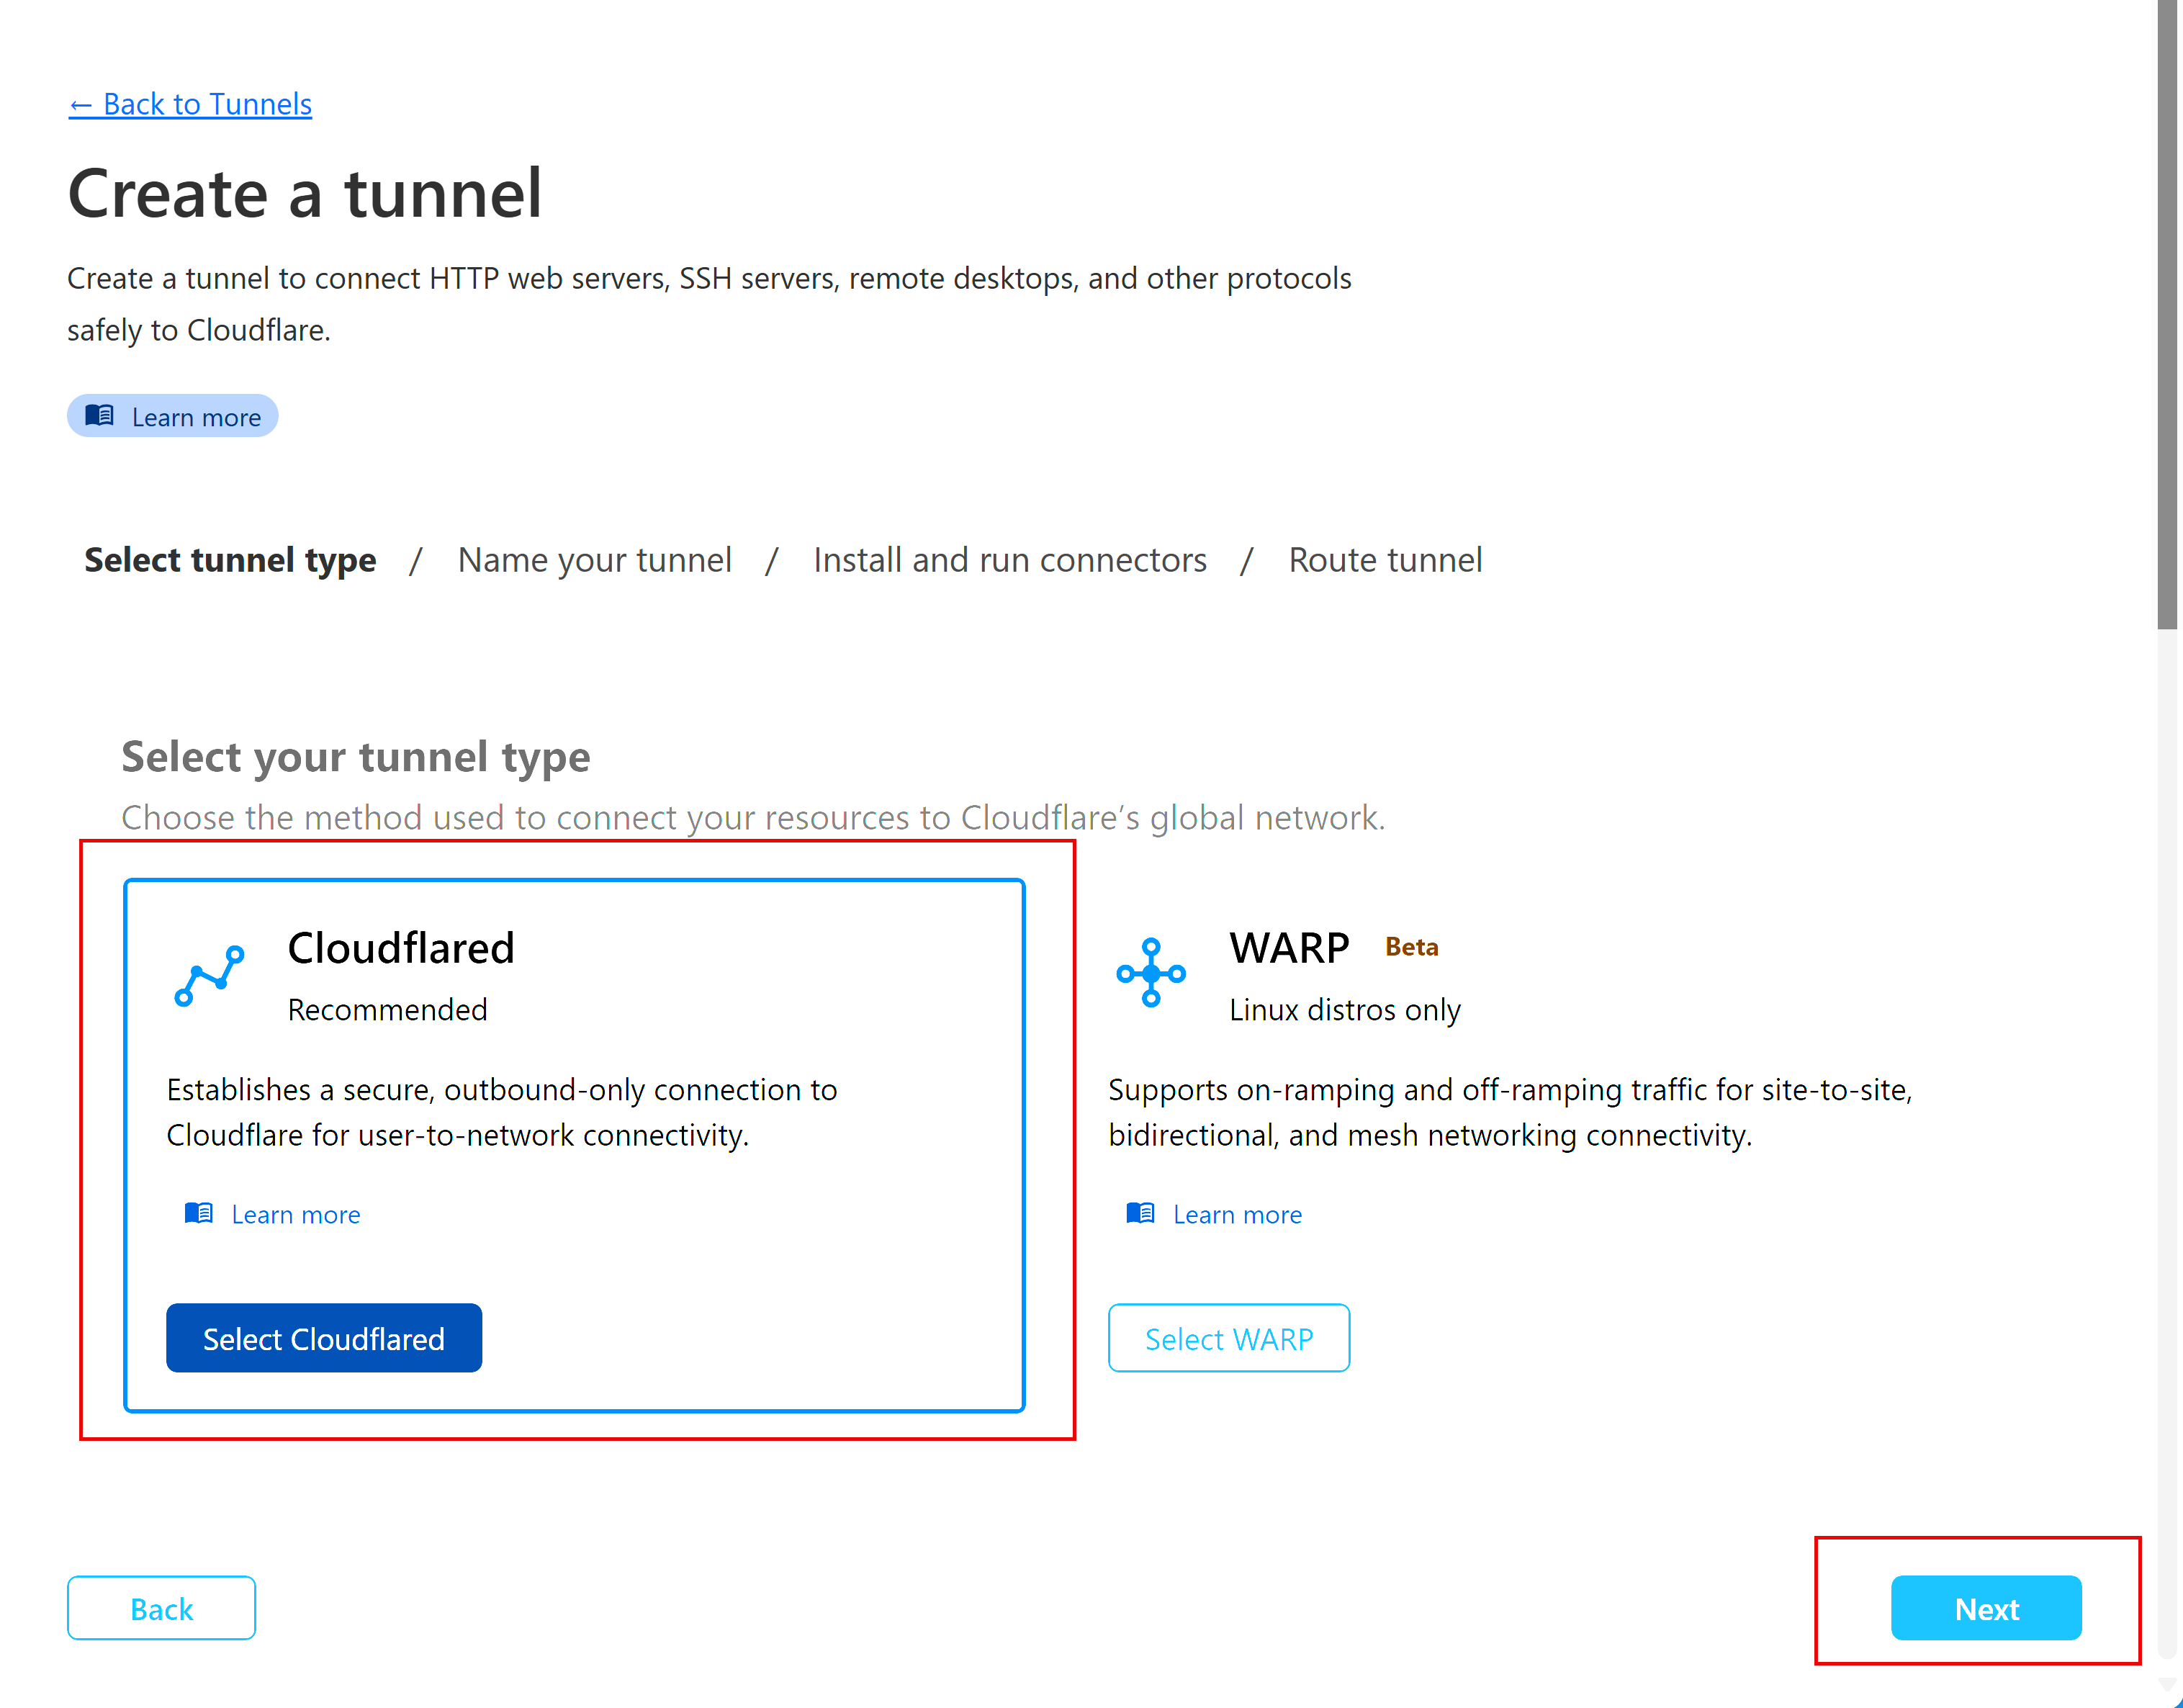
- Provide any name to the tunnel and click
Save Tunnel.
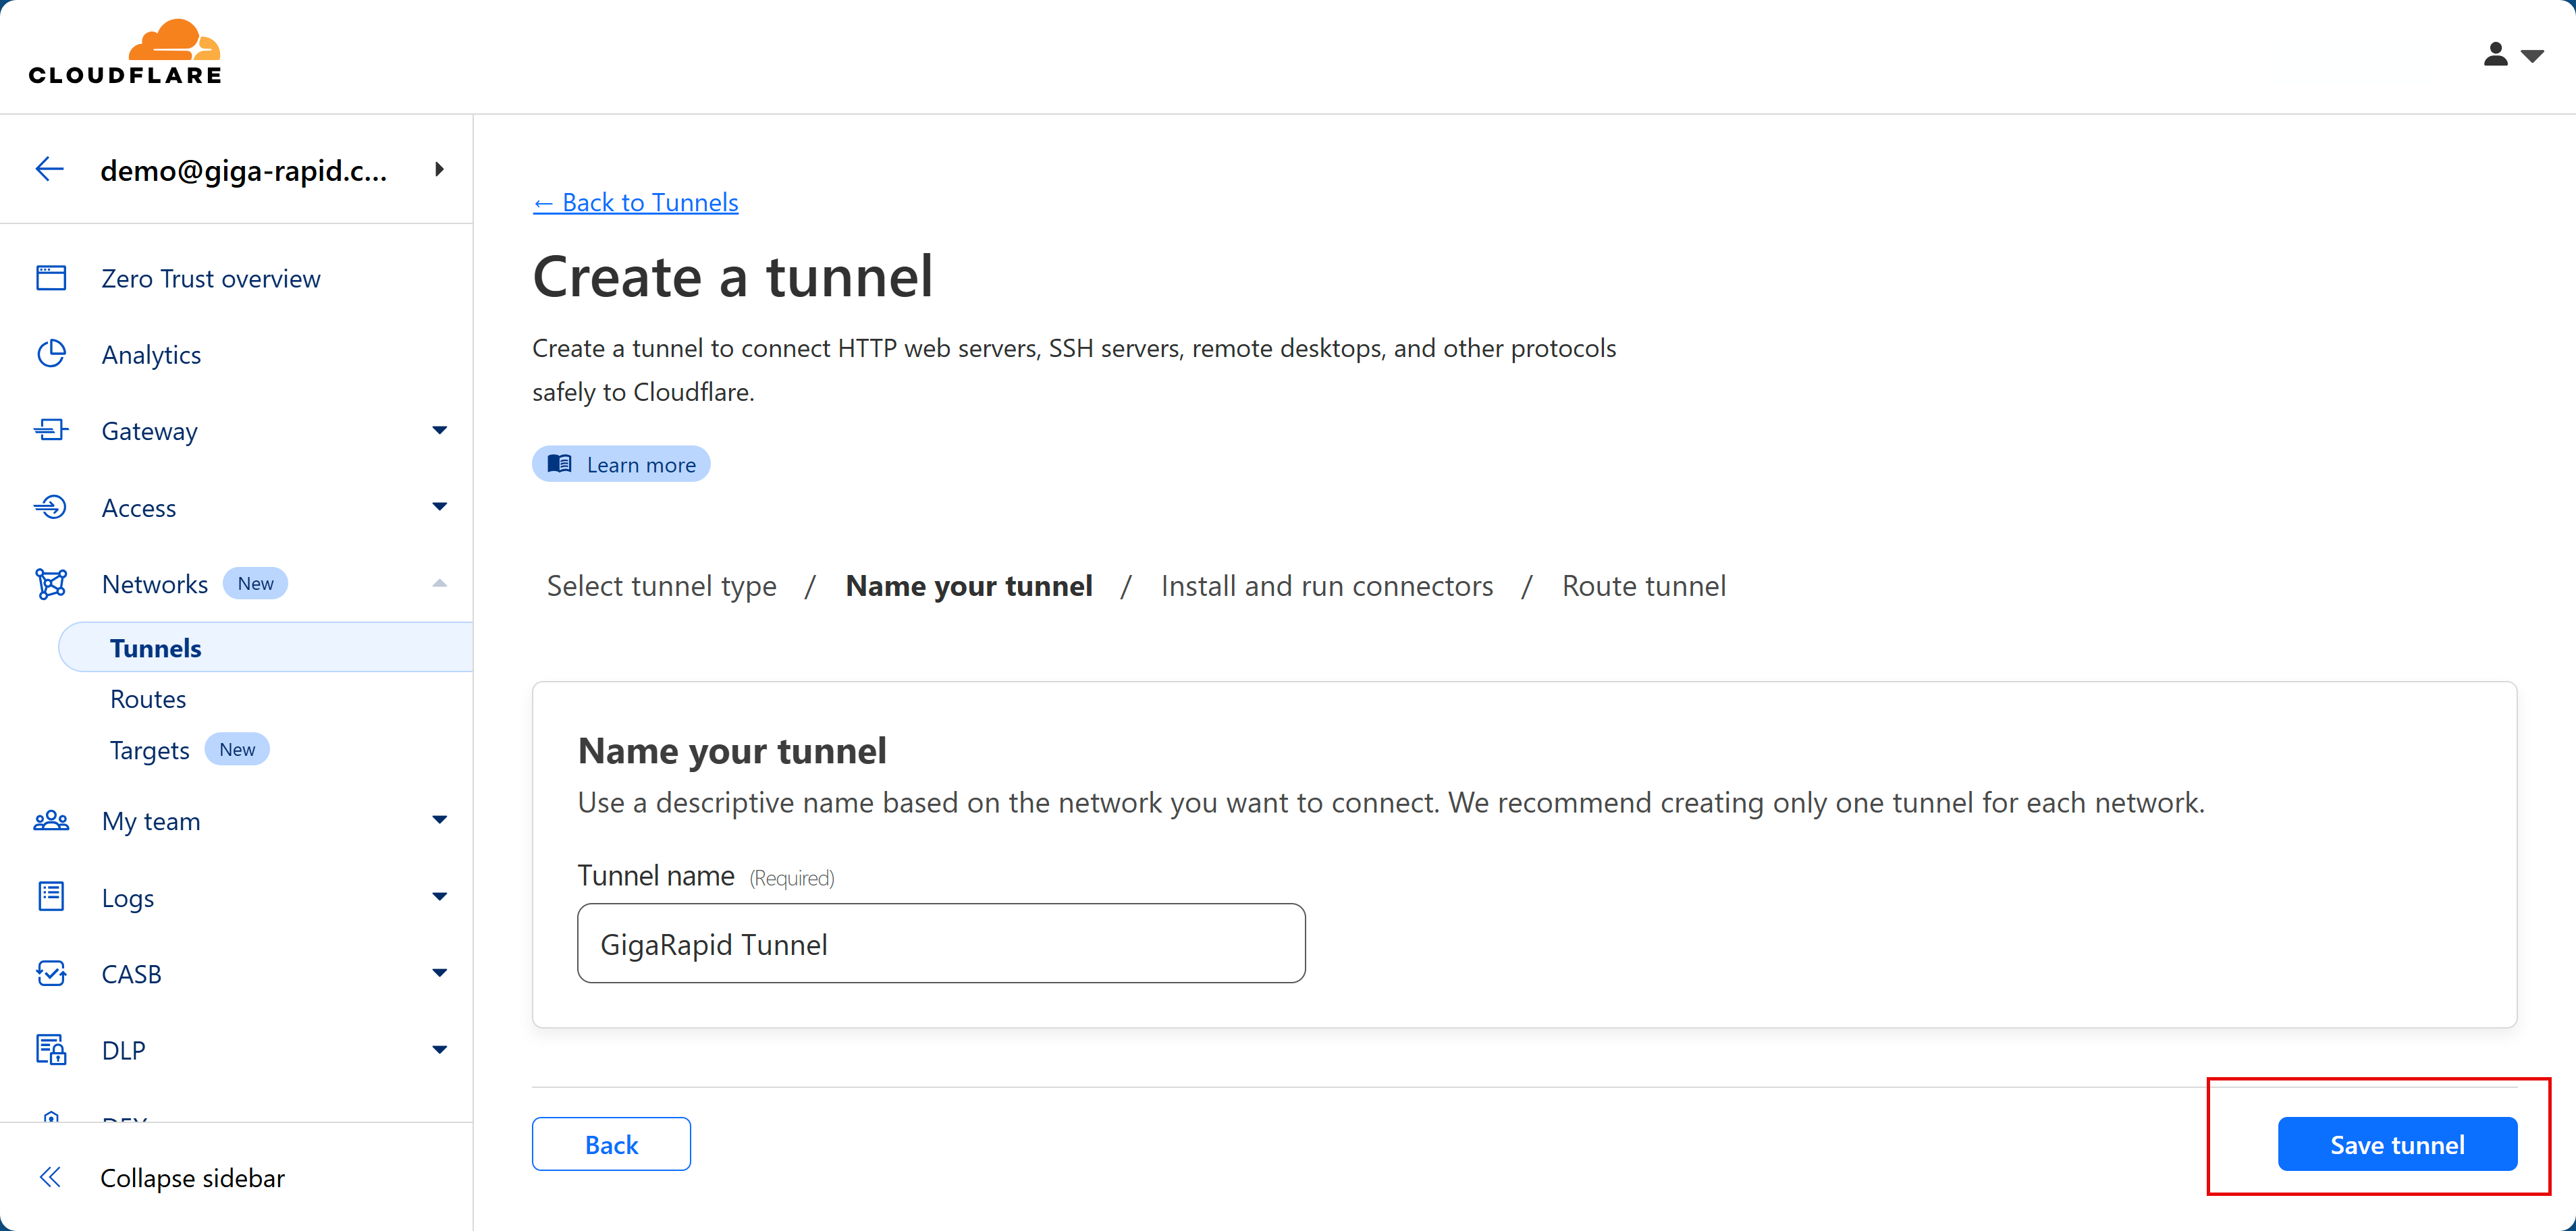
- On this step, you will get a command to copy at the step 4 (as highlighted).
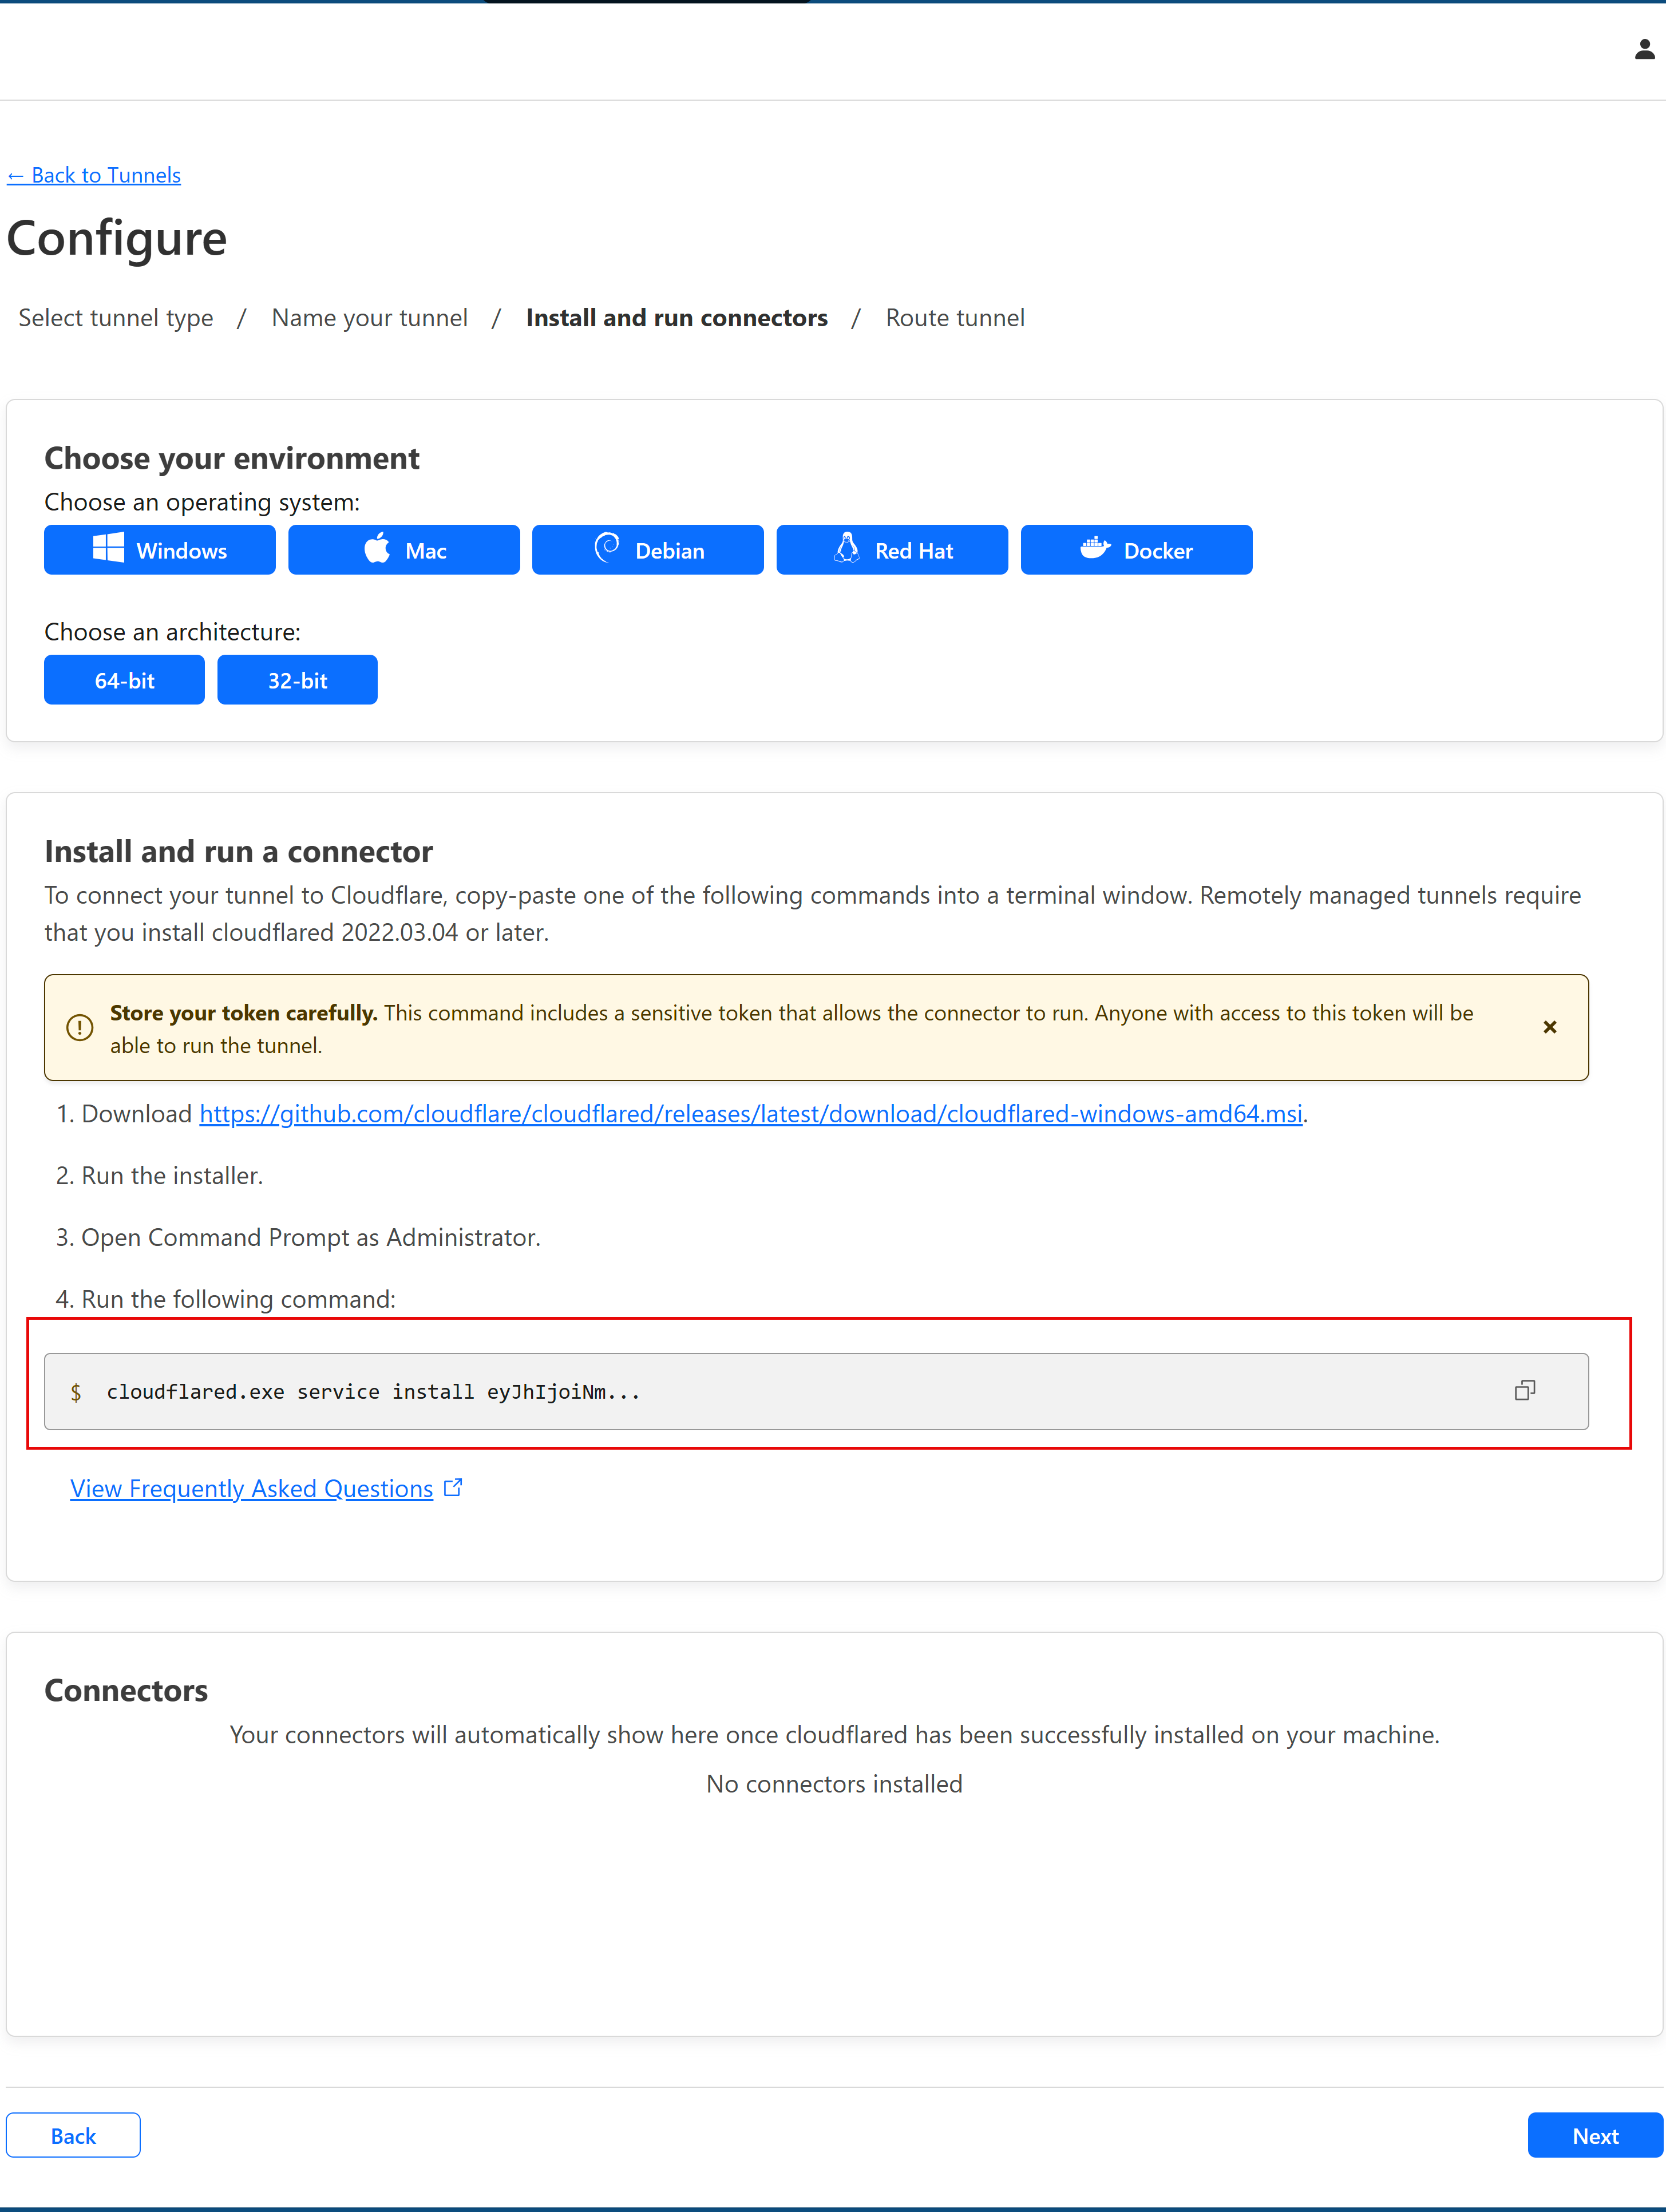
- Click the command to copy it. The command will look like the following
cloudflared.exe service install XXXXXXXXXXXXXXXXXX
- Here
XXXXXXXXXXXXXXXXXXis your tunnel token, which appears right after the wordinstall. Now, copy the token and save it for later use. - In this step, choose your custom domain in the
Domaindropdown menu and set the service type and URL as per your choice. Then clickSave Tunnel.
This is a dummy step. You can fill in any value or like the screenshot below and proceed to the next step.
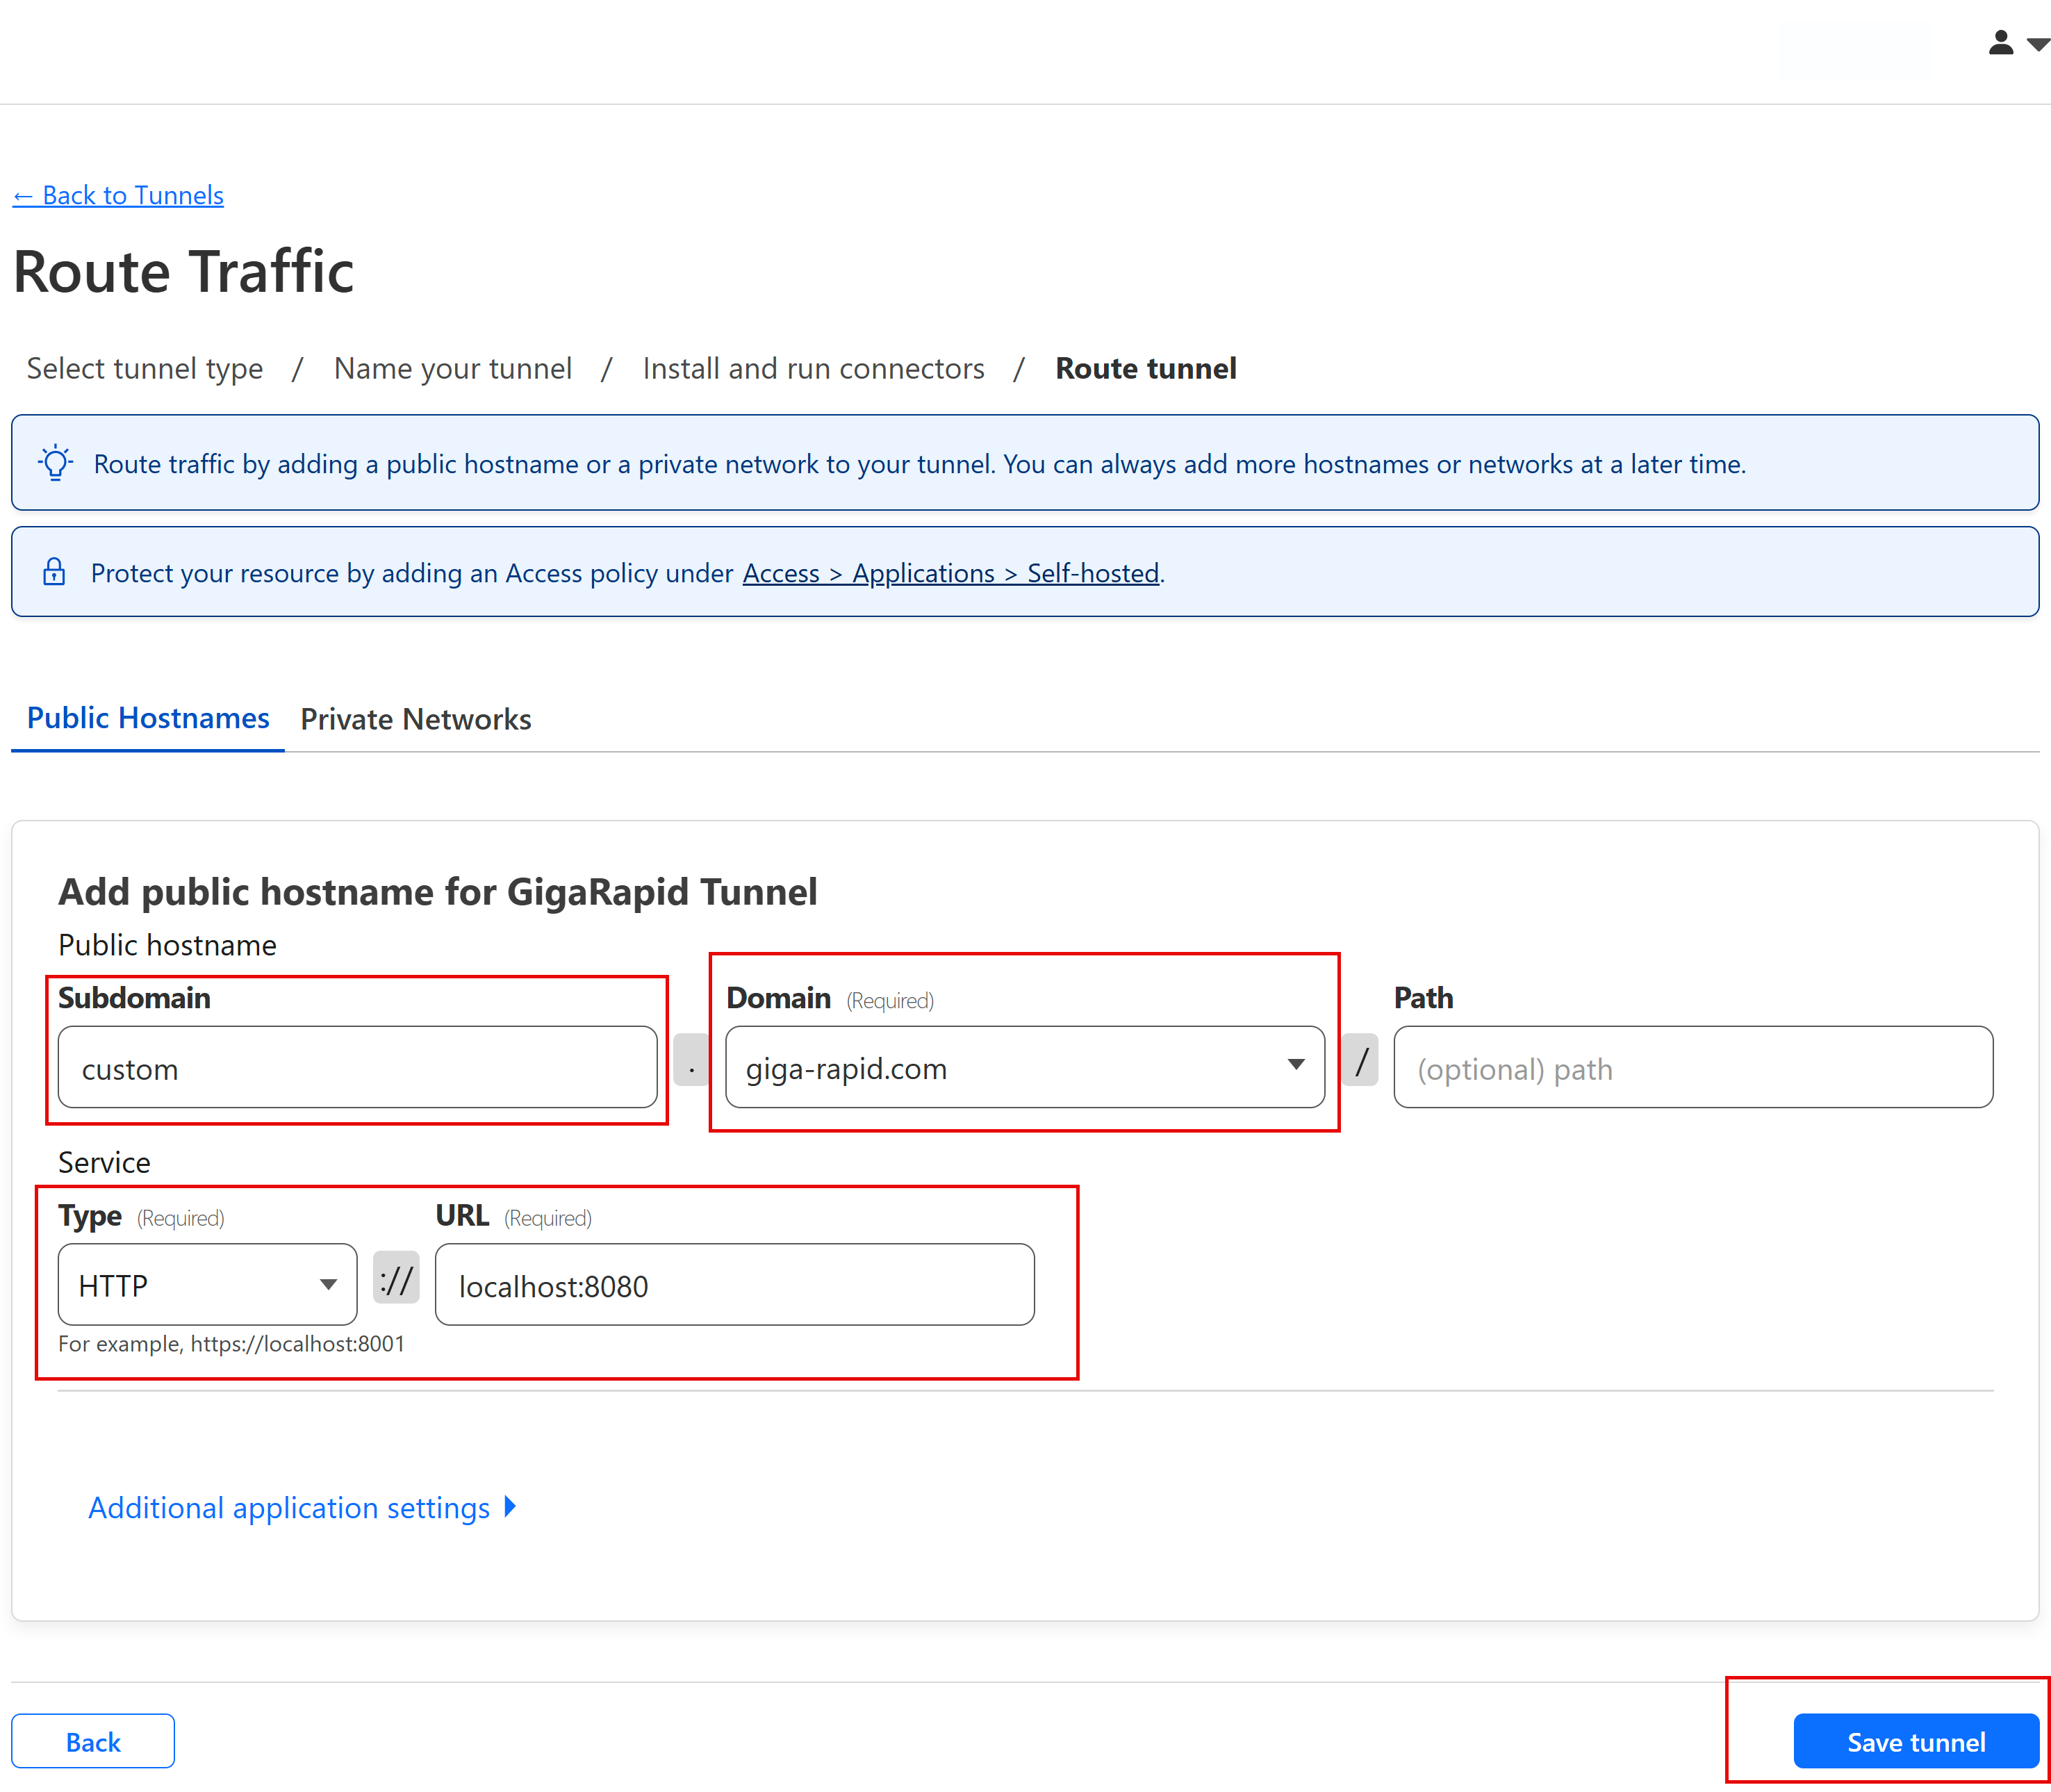
We have used
giga-rapid.comas a custom domain for demonstration only. You need to have your own domain configured in Cloudflare to complete this step.
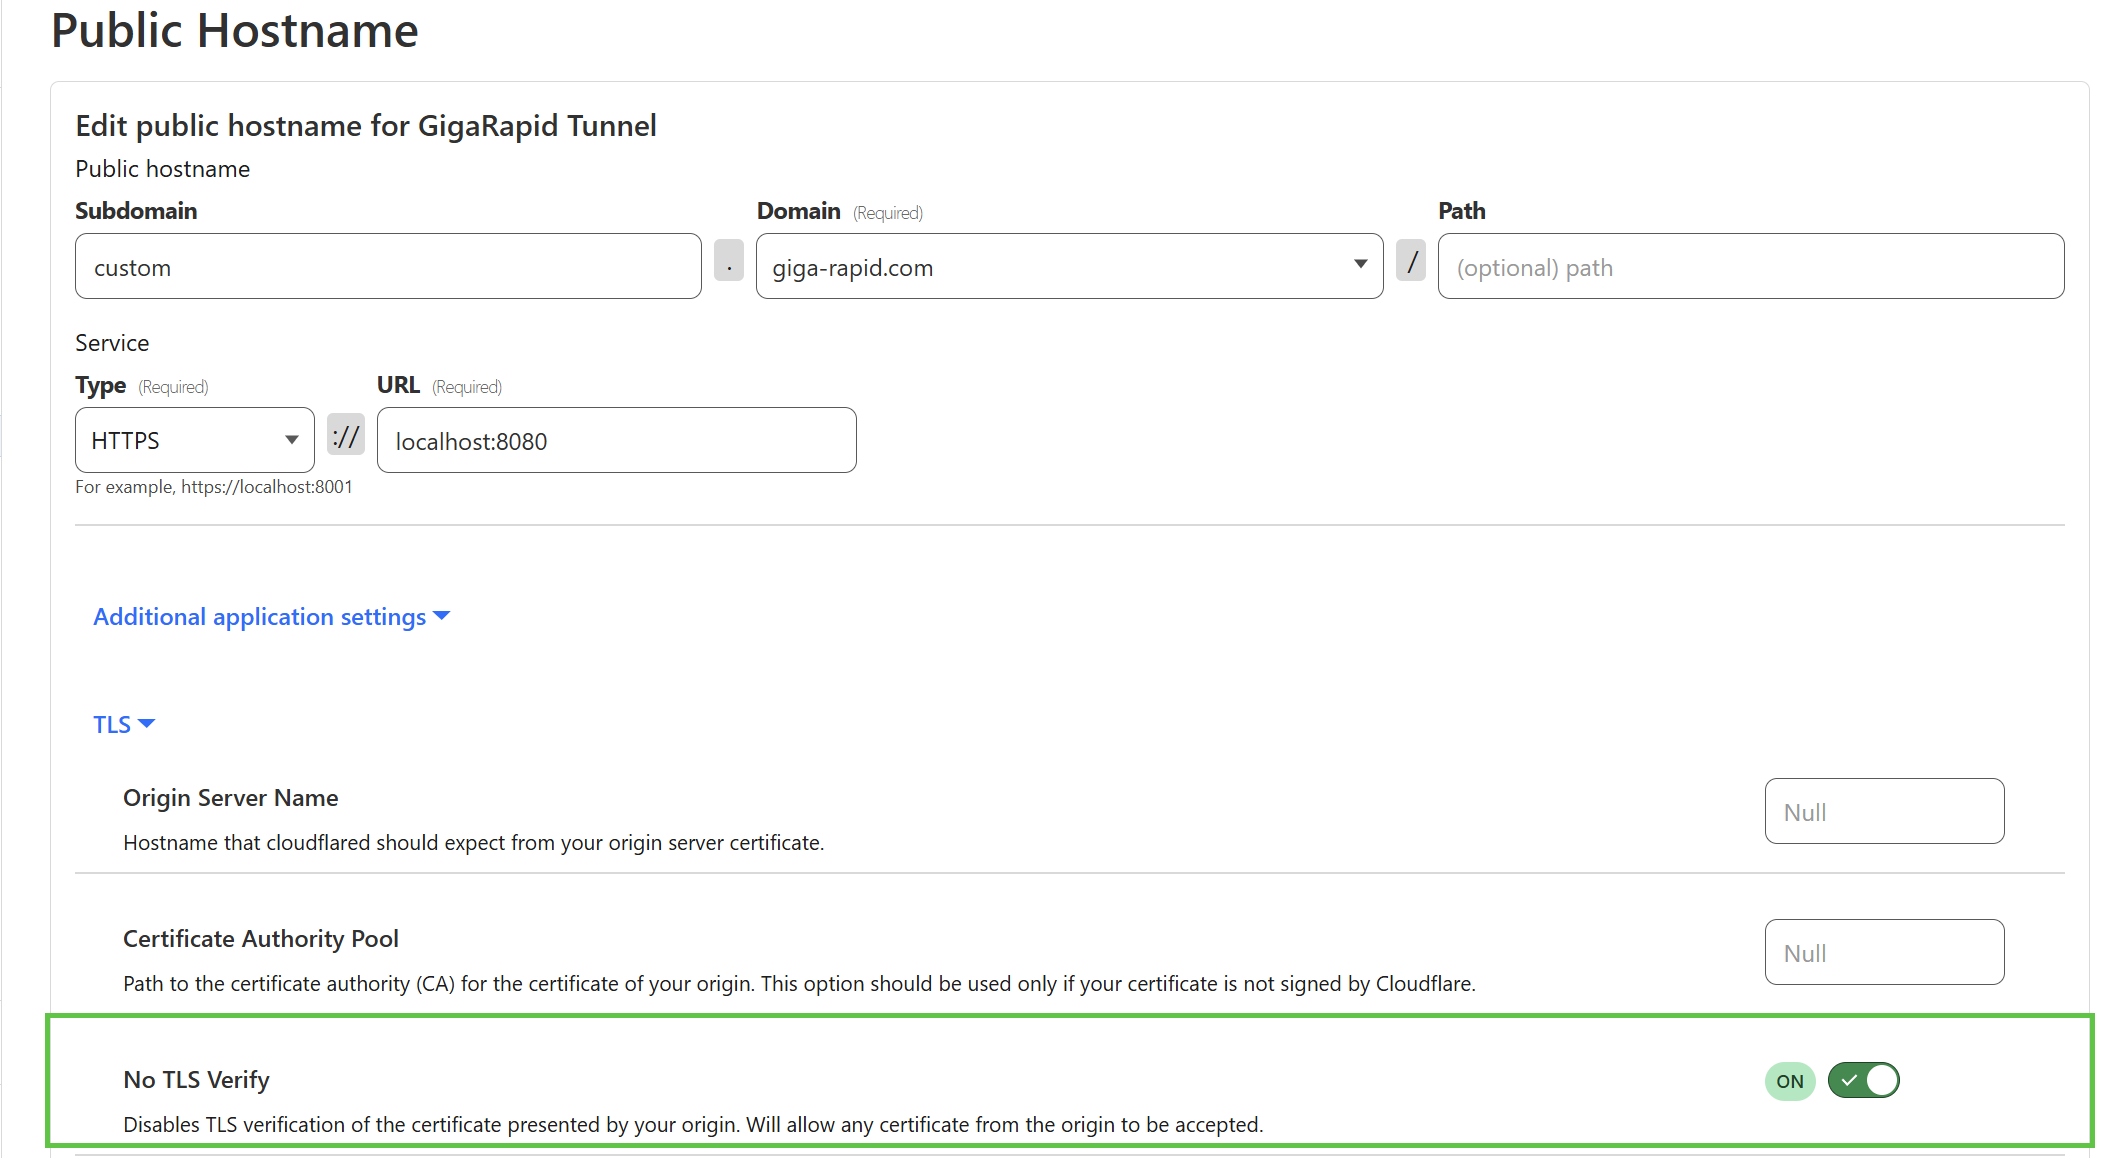
If you are setting
Service TypetoHTTPS, make sure to ensure disable TLS verification, i.e turn onNo TLS Verifyoption as you can see in the screenshot below.
- Navigate to the Application Manager page and search for
Cloudflared. - Click icon to open the installation window and enter the
Tunnel Tokencopied earlier. - Tap Install to start the installation process.
- Once the installation is complete, click icon to open the Access Info page. For further configuration please follow the next section.
¶ Configuring Cloudflared
¶ Setting up custom domain for GigaDrive Apps
- Navigate to
Network>Tunnelsand then click the settings icon at the right indicated by the three black dots. - Click
Configure

- Click
Add a public hostname.

- In this step we will use a subdomain to access any GigaDrive app using a custom domain.
- Let’s say you want to access
Jdownloader. Then, we will putJdownloader2in theSubdomaintext field. Then set service typeHTTPand URL tojdownloader2-gigauser:5800
In this case
jdownloader2-gigauseris the internal hostname and5800is the internal web port for the jdownloader2 application. You can find internal hostname for any app by clicking theAccessbutton within the applications page.
- Once configured, you will be able to access Jdownloader from your own custom domain/subdomain.
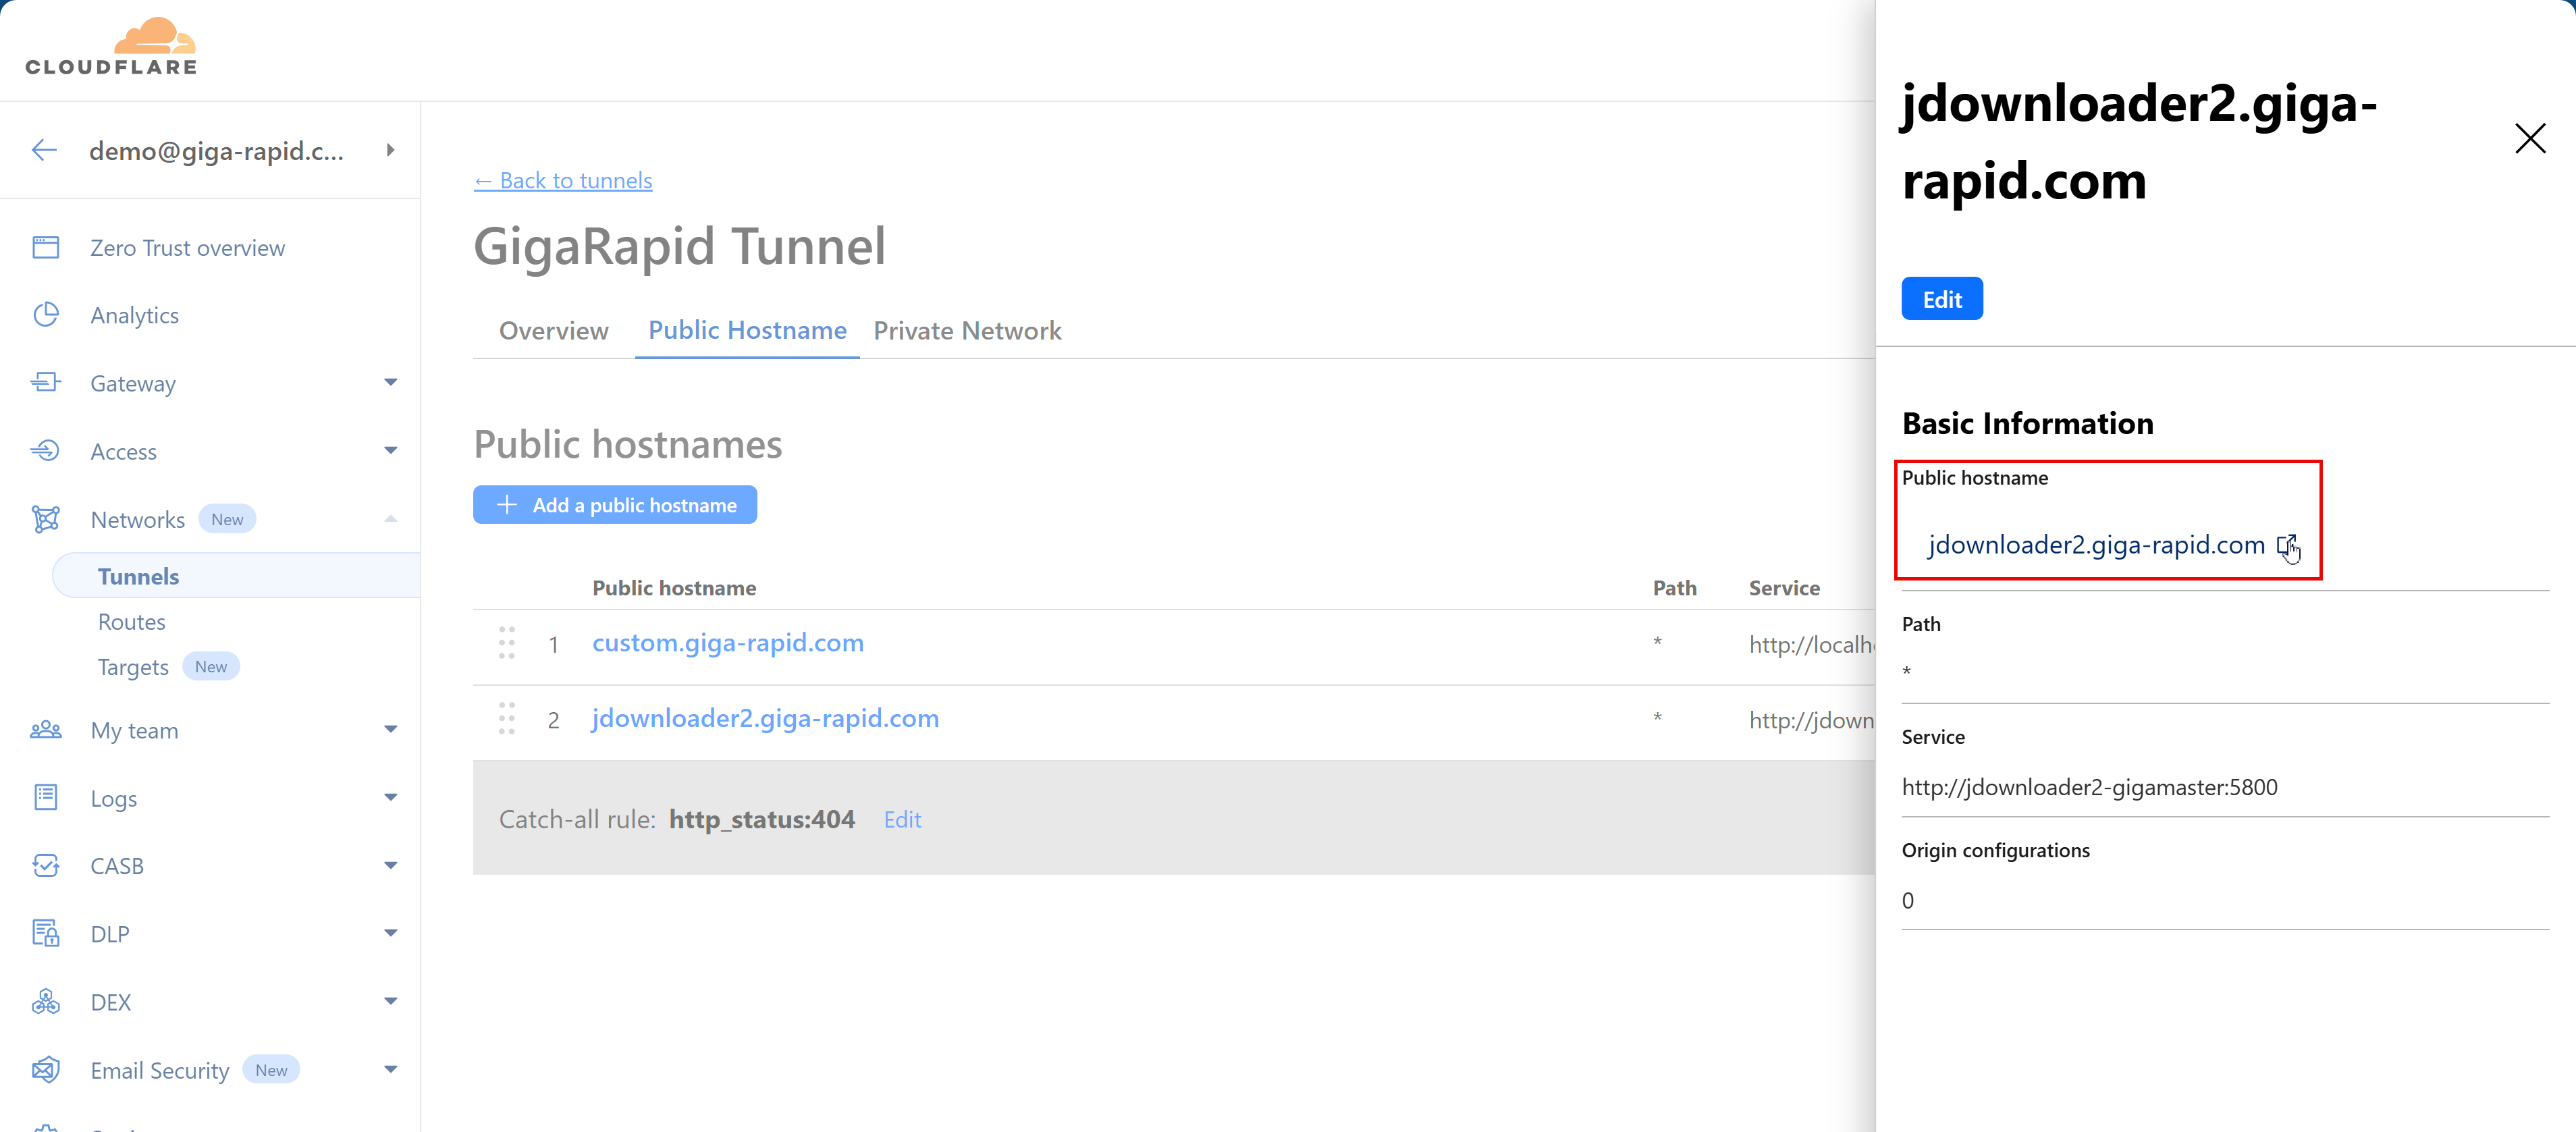
We have used
giga-rapid.comas a custom domain for demonstration only. You need to have your own domain configured in Cloudflare to complete this step.
¶ Finding Internal Hostname and Port For Any App
¶ Regular Method
Internal ports will not be visible for older app installations. Please refer to the alternative method for guidance.
- In this guide we will find hostname and port for the app
jdownloader2. - Navigate to the Application Manager page and search for
jdownloader2.

- Once the installation is complete, click Access icon to open the Access Info page.
- Scroll down and you will find the
Internal HostnameandInternal Port(s)for this app.
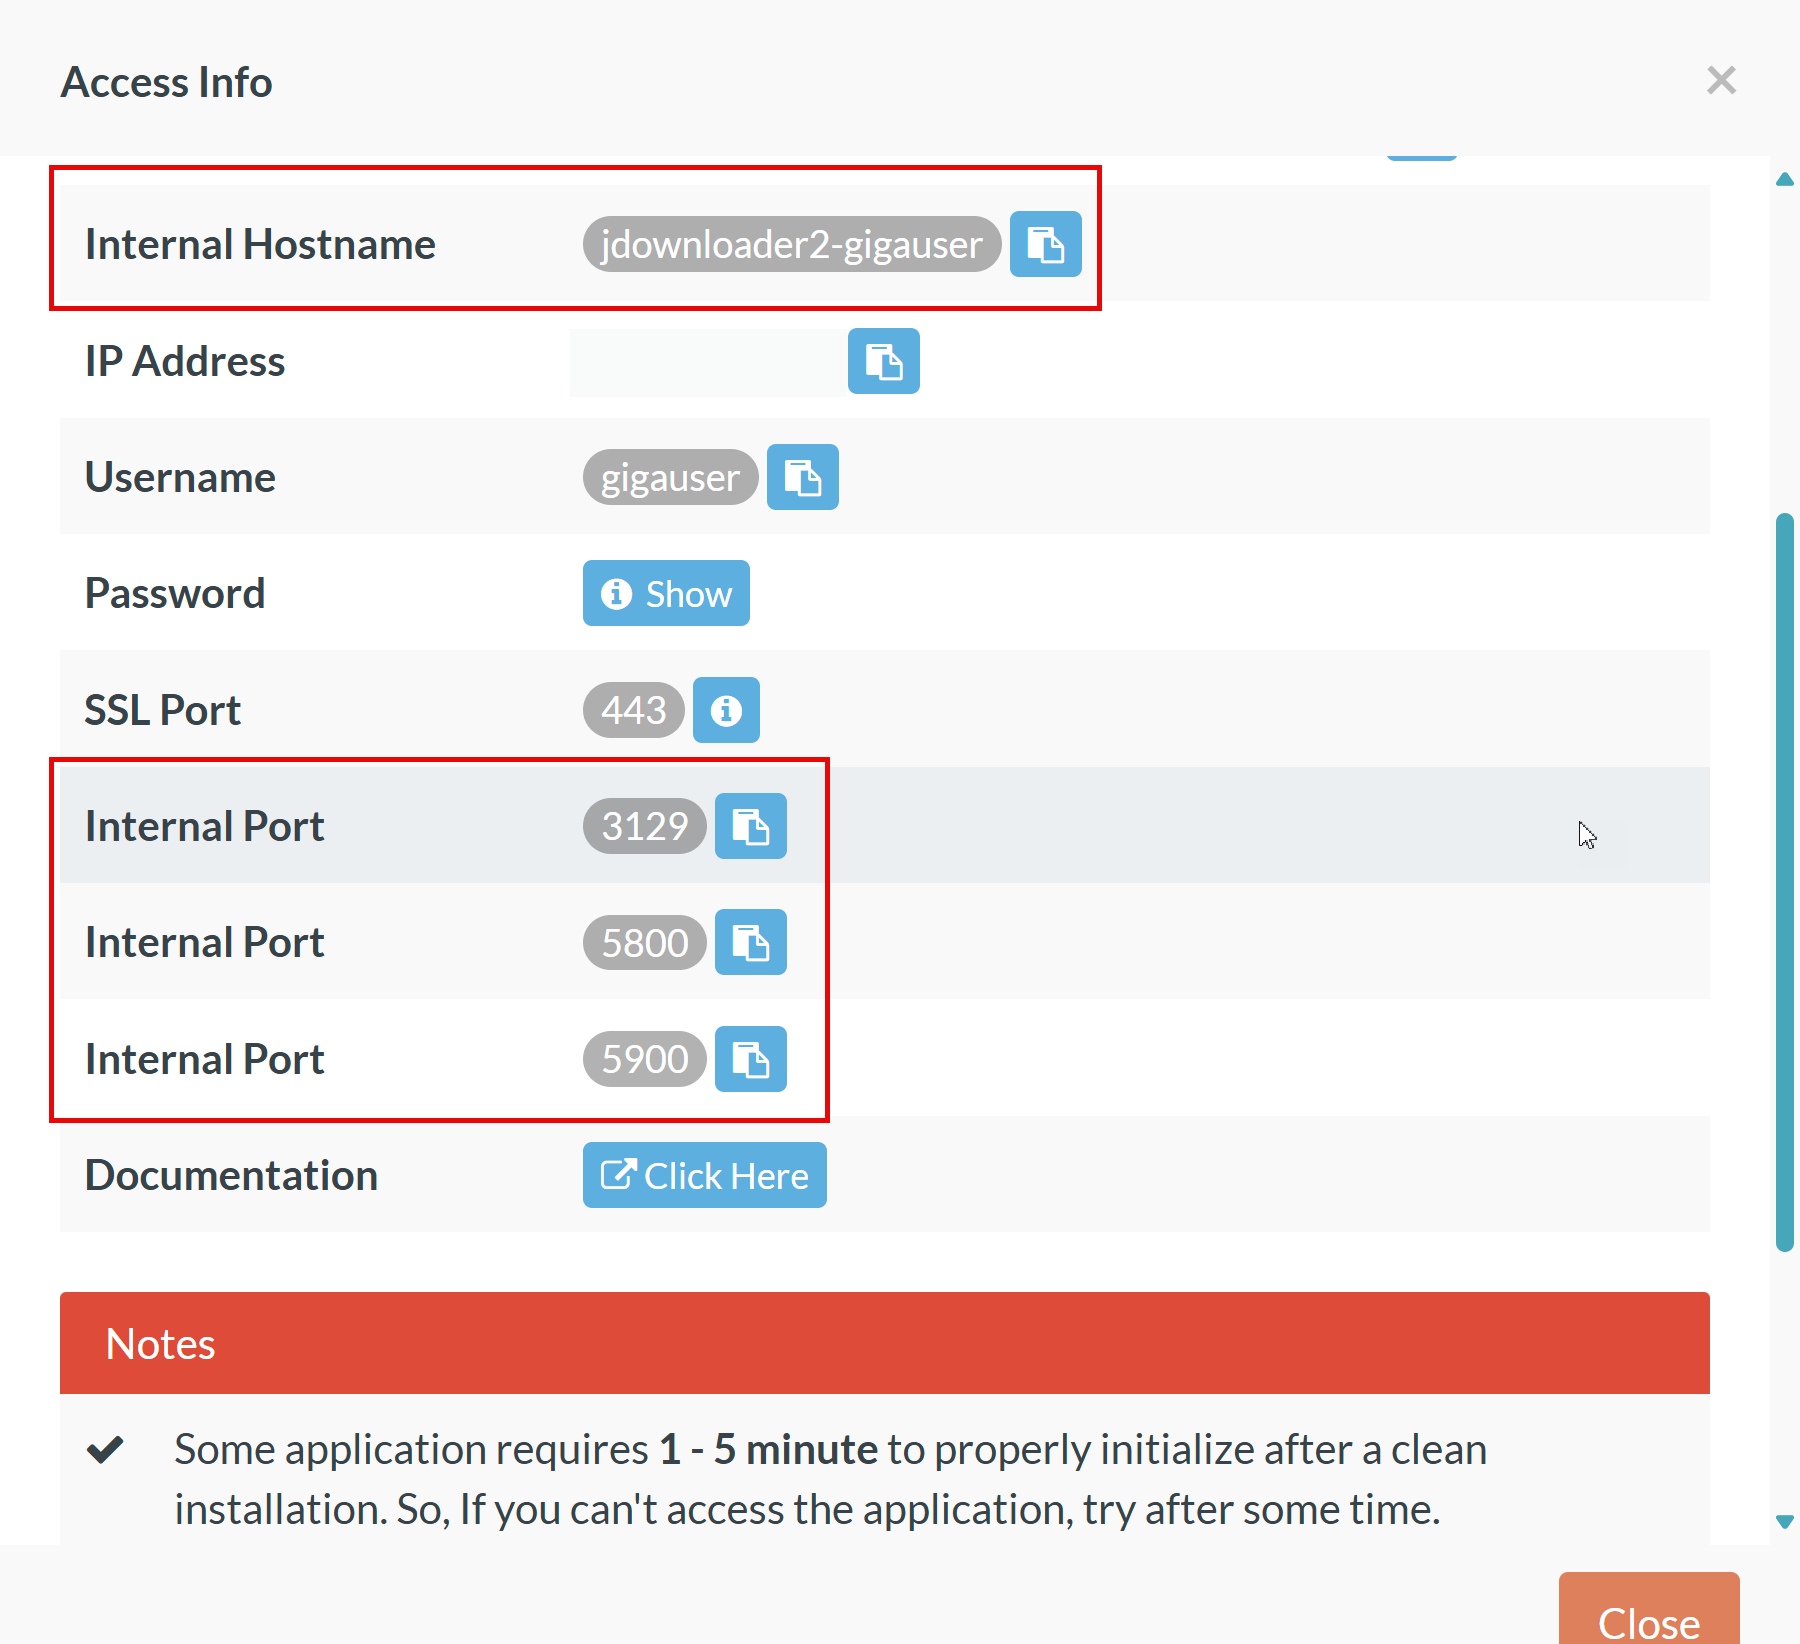
Most applications will have only single internal port. In this case we have multiple internal ports. For Jdownloader port
5800provides the web interface. So, we will use this port. If you are not sure which port provides web access, you can try all the ports in the provided order.
¶ Alternative Method
- Navigate to the Application Manager page and search for
jdownloader2. - Once the installation is complete, click Status button to open the Status page.

- In this page you will find the
Internal HostnameandInternal Port(s)for this app.
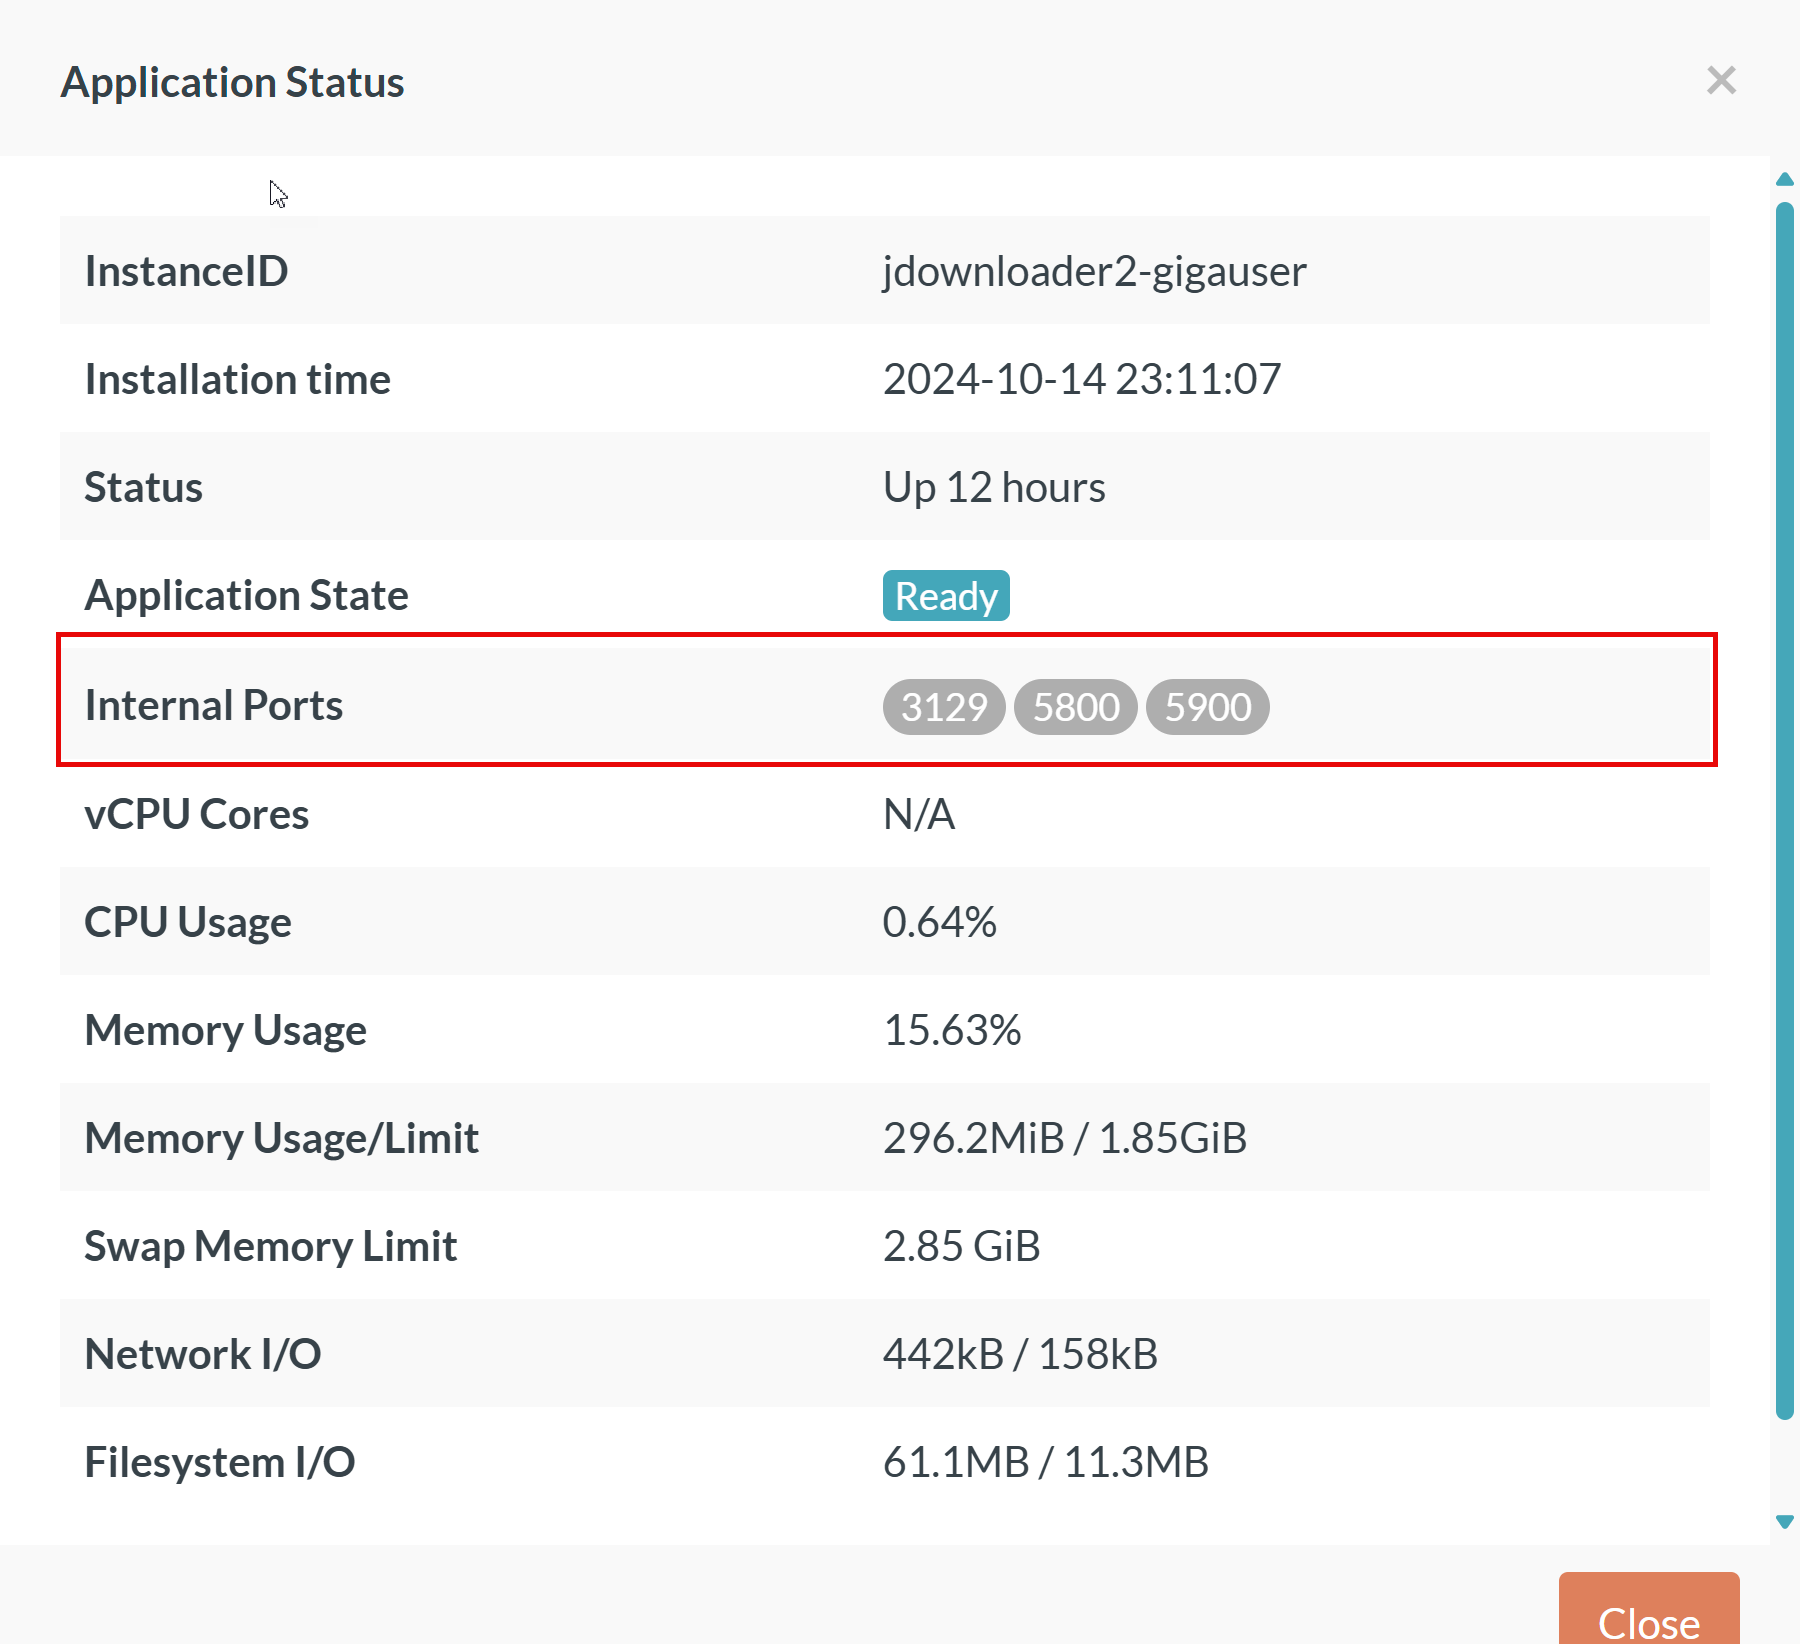
Most applications will have only single internal port. In this case we have multiple internal ports. For Jdownloader port
5800provides the web interface. So, we will use this port. If you are not sure which port provides web access, you can try all the ports in the provided order.